Compaq dx2000 HP Compaq Business Desktop dx2000 Series Personal Computers Serv - Page 57
Power Switch Assembly
 |
View all Compaq dx2000 manuals
Add to My Manuals
Save this manual to your list of manuals |
Page 57 highlights
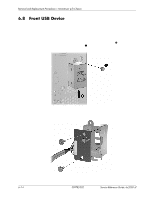
Removal and Replacement Procedures- Microtower (µT) Chassis 6.9 Power Switch Assembly 1. Prepare the computer for disassembly (Section 6.1, "Preparation for Disassembly"). 2. Remove the right access panel (Section 6.2, "Access Panel"). 3. Remove the front bezel (Section 6.3, "Front Bezel"). 4. Remove the diskette drive (Section 6.7.3, "Removing a Diskette Drive"). 5. Disconnect the power, and data cables from the back of all installed 3.5" drives. 6. Remove the lower drive cage (Section 6.7.4, "Removing the Lower Drive Cage"). 7. Disconnect the power switch cable from the system board. 8. From the inside of the chassis, squeeze the two lower retaining clips together 1 while rotating the bottom of the power switch out of the chassis 2. To install the power switch assembly, reverse the removal procedure. Service Reference Guide, dx2000 uT 359782-002 6-15
-
 1
1 -
2
-
3
-
4
-
5
-
6
-
7
-
8
-
9
-
10
-
11
-
12
-
13
-
14
-
15
-
16
-
17
-
18
-
19
-
20
-
21
-
22
-
23
-
24
-
25
-
26
-
27
-
28
-
29
-
30
-
31
-
32
-
33
-
34
-
35
-
36
-
37
-
38
-
39
-
40
-
41
-
42
-
43
-
44
-
45
-
46
-
47
-
48
-
49
-
50
-
51
-
 52
52 -
 53
53 -
 54
54 -
 55
55 -
 56
56 -
 57
57 -
 58
58 -
 59
59 -
 60
60 -
 61
61 -
 62
62 -
63
-
64
-
65
-
66
-
67
-
68
-
69
-
70
-
71
-
72
-
73
-
74
-
75
-
76
-
77
-
78
-
79
-
80
-
81
-
82
-
83
-
84
-
85
-
86
-
87
-
88
-
89
-
90
-
91
-
92
-
93
-
94
-
95
-
96
-
97
-
98
-
99
-
100
-
101
-
102
-
103
-
104
-
105
-
106
 |
 |
