Casio EX-Z700 Owners Manual - Page 219
Click the Photo Transport Capture button., screen you want to capture.
 |
View all Casio EX-Z700 manuals
Add to My Manuals
Save this manual to your list of manuals |
Page 219 highlights
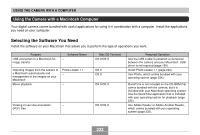
USING THE CAMERA WITH A COMPUTER 2. Follow the instructions that appear on the display to transfer the image file to the camera. • The image transfer method and detailed image settings used depend on the Photo Transport settings. For details, see Photo Transport help (page 220). To transfer screen captures to the camera 1. Click the Photo Transport Capture button. 2. Use your mouse to select the area of the screen you want to capture. • Move your mouse pointer to the upper left corner of the area you want to capture and then hold down your mouse button. Keeping your mouse button depressed, drag the pointer down to the right corner of the area and then release the mouse button. Capture button Capture area 219
-
 1
1 -
2
-
3
-
4
-
5
-
6
-
7
-
8
-
9
-
10
-
11
-
12
-
13
-
14
-
15
-
16
-
17
-
18
-
19
-
20
-
21
-
22
-
23
-
24
-
25
-
26
-
27
-
28
-
29
-
30
-
31
-
32
-
33
-
34
-
35
-
36
-
37
-
38
-
39
-
40
-
41
-
42
-
43
-
44
-
45
-
46
-
47
-
48
-
49
-
50
-
51
-
52
-
53
-
54
-
55
-
56
-
57
-
58
-
59
-
60
-
61
-
62
-
63
-
64
-
65
-
66
-
67
-
68
-
69
-
70
-
71
-
72
-
73
-
74
-
75
-
76
-
77
-
78
-
79
-
80
-
81
-
82
-
83
-
84
-
85
-
86
-
87
-
88
-
89
-
90
-
91
-
92
-
93
-
94
-
95
-
96
-
97
-
98
-
99
-
100
-
101
-
102
-
103
-
104
-
105
-
106
-
107
-
108
-
109
-
110
-
111
-
112
-
113
-
114
-
115
-
116
-
117
-
118
-
119
-
120
-
121
-
122
-
123
-
124
-
125
-
126
-
127
-
128
-
129
-
130
-
131
-
132
-
133
-
134
-
135
-
136
-
137
-
138
-
139
-
140
-
141
-
142
-
143
-
144
-
145
-
146
-
147
-
148
-
149
-
150
-
151
-
152
-
153
-
154
-
155
-
156
-
157
-
158
-
159
-
160
-
161
-
162
-
163
-
164
-
165
-
166
-
167
-
168
-
169
-
170
-
171
-
172
-
173
-
174
-
175
-
176
-
177
-
178
-
179
-
180
-
181
-
182
-
183
-
184
-
185
-
186
-
187
-
188
-
189
-
190
-
191
-
192
-
193
-
194
-
195
-
196
-
197
-
198
-
199
-
200
-
201
-
202
-
203
-
204
-
205
-
206
-
207
-
208
-
209
-
210
-
211
-
212
-
213
-
 214
214 -
 215
215 -
 216
216 -
 217
217 -
 218
218 -
 219
219 -
 220
220 -
 221
221 -
 222
222 -
 223
223 -
 224
224 -
225
-
226
-
227
-
228
-
229
-
230
-
231
-
232
-
233
-
234
-
235
-
236
-
237
-
238
-
239
-
240
-
241
-
242
-
243
-
244
-
245
-
246
-
247
 |
 |

USING THE CAMERA WITH A COMPUTER
219
2.
Follow the instructions that appear on the
display to transfer the image file to the
camera.
•
The image transfer method and detailed image
settings used depend on the Photo Transport
settings. For details, see Photo Transport help (page
220).
To transfer screen captures to the camera
1.
Click the Photo Transport Capture button.
2.
Use your mouse to select the area of the
screen you want to capture.
•
Move your mouse pointer to the upper left corner of
the area you want to capture and then hold down
your mouse button. Keeping your mouse button
depressed, drag the pointer down to the right corner
of the area and then release the mouse button.
Capture button
Capture area