Canon LX-MU800Z User Manual - Page 30
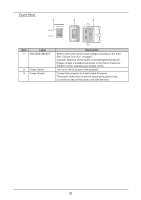
Label, Description, SERVICE, ENTER, Press numeric to set Control ID or Remote ID.
 |
View all Canon LX-MU800Z manuals
Add to My Manuals
Save this manual to your list of manuals |
Page 30 highlights
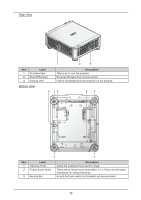
Item Label Description 5▲ Press to select or change settings in the OSD. 6◄ Press to select or change settings in the OSD. 7▼ Press to select or change settings in the OSD. 8 MENU Press to display, hide the OSD menu or return the previous OSD menu. 9 BLANK Press to light or blank the Light output. 10 AUTO PC Press to initiate the automatic synchronization procedure. 11 COMPUTER1 Press to switch input signal to COMPUTER1. 12 HDMI2 Press to switch input signal to HDMI. 13 HDMI1 14 3G-SDI Press to switch input signal to 3D-SDI. 15 DisplayPort No function. 16 CLEAR Reset the stored Remote ID. 17 FREEZE (*1) Press to freeze the projected image. 18 OFF Press to turn off the projector. 19 TEST PATTERN Press to display the test pattern and press again to switch to the next test pattern. Press EXIT to return the projected image. 20 LENS-SHIFT Press to move the lens up, down, right or left. 21 ENTER (*2) Press to confirm the changed settings. 22 ► Press to select or change settings in the OSD. 23 EXIT Press to exit the OSD menu. 24 STATUS Press to display the SERVICE menu (OSD). 25 COMPUTER2 Press to switch input signal to COMPUTER2. 26 ASPECT Press to switch to the next aspect ratio setting. 27 DVI Press to switch input signal to DVI-D. 28 HDBaseT Press to switch input signal to HDBaseT. 29 ID SET Press to set the Remote ID. 30 Numeric buttons Press numeric to set Control ID or Remote ID. (*1) This function is applicable to 2D signal. (*2) Lens Adjustment Screen appears when ENTER button is pressed when OSD is not displayed. 24
-
 1
1 -
2
-
3
-
4
-
5
-
6
-
7
-
8
-
9
-
10
-
11
-
12
-
13
-
14
-
15
-
16
-
17
-
18
-
19
-
20
-
21
-
22
-
23
-
24
-
 25
25 -
 26
26 -
 27
27 -
 28
28 -
 29
29 -
 30
30 -
 31
31 -
 32
32 -
 33
33 -
 34
34 -
 35
35 -
36
-
37
-
38
-
39
-
40
-
41
-
42
-
43
-
44
-
45
-
46
-
47
-
48
-
49
-
50
-
51
-
52
-
53
-
54
-
55
-
56
-
57
-
58
-
59
-
60
-
61
-
62
-
63
-
64
-
65
-
66
-
67
-
68
-
69
-
70
-
71
-
72
-
73
-
74
-
75
-
76
-
77
-
78
-
79
-
80
-
81
-
82
-
83
-
84
-
85
-
86
-
87
-
88
-
89
-
90
-
91
-
92
-
93
-
94
-
95
-
96
-
97
-
98
-
99
-
100
-
101
-
102
-
103
-
104
-
105
-
106
-
107
-
108
-
109
-
110
-
111
-
112
-
113
-
114
-
115
-
116
 |
 |
