Canon LV-7292M User Manual - Page 59
Remote control, Code 1, To change the code for the proJector, Lamp mode, of the screen.
 |
View all Canon LV-7292M manuals
Add to My Manuals
Save this manual to your list of manuals |
Page 59 highlights
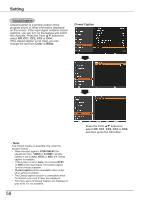
Lamp mode This function allows you to change brightness of the screen. High........... Brighter than the Normal mode. Normal....... Normal brightness Eco Lower brightness reduces the lamp power consumption and extends the lamp life. Note: • Lamp mode can not be changed for a while after turning on the projector. Lamp needs some time to stabilize after the power is turned on. Stored lamp mode will be active after the lamp is stabilized. Remote control This projector provides two different remote control codes: the factory-set initial code (Code 1) and the secondary code (Code 2). This switching function prevents remote control unit interference when operating several projectors or video equipment at the same time. When operating the projector in Code 2, both the projector and the remote control unit must be switched to Code 2. To change the code for the projector: Select either Code 1 or Code 2 in this Setting Menu. To change the code for the remote control unit: Press and hold both the MENU and IMAGE buttons together for 5 seconds or more. After changing the code, make sure the remote control unit operates properly. Remote control Note: • When different codes are set on the projector and on the remote control unit, any operation cannot be made. In that case, switch the code on the remote control unit to fit the code on the projector. • If the batteries are removed from the remote control unit for a long period of time, the remote control code will be reset. Setting 59
-
 1
1 -
2
-
3
-
4
-
5
-
6
-
7
-
8
-
9
-
10
-
11
-
12
-
13
-
14
-
15
-
16
-
17
-
18
-
19
-
20
-
21
-
22
-
23
-
24
-
25
-
26
-
27
-
28
-
29
-
30
-
31
-
32
-
33
-
34
-
35
-
36
-
37
-
38
-
39
-
40
-
41
-
42
-
43
-
44
-
45
-
46
-
47
-
48
-
49
-
50
-
51
-
52
-
53
-
 54
54 -
 55
55 -
 56
56 -
 57
57 -
 58
58 -
 59
59 -
 60
60 -
 61
61 -
 62
62 -
 63
63 -
 64
64 -
65
-
66
-
67
-
68
-
69
-
70
-
71
-
72
-
73
-
74
-
75
-
76
-
77
-
78
-
79
-
80
-
81
-
82
-
83
-
84
 |
 |
