Bosch NGM8656UC Installation instructions - Page 6
Before You Begin
 |
View all Bosch NGM8656UC manuals
Add to My Manuals
Save this manual to your list of manuals |
Page 6 highlights
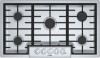
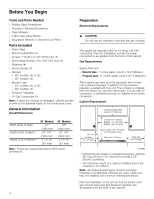
Before You Begin Tools and Parts Needed ▯ Phillips Head Screwdriver ▯ Precision Flathead Screwdriver ▯ Tape Measure ▯ Teflon Tape (Gas Rated) ▯ Adjustable Wrench or Channel Lock Pliers Parts Included ▯ Foam Tape ▯ Mounting Brackets (4) ▯ Screws, #10-32 x 2 1/2" (63.8 mm) (4) ▯ Sheet Metal Screws, #8 x 3/8" (9.5 mm) (4) ▯ Washers (4) ▯ Burner Grates (3) ▯ Burners ▯ 30" models: (4) or (5) ▯ 36" models: (5) ▯ Burner Caps ▯ 30" models: (4) or (5) ▯ 36" models: (5) ▯ Pressure Regulator ▯ LP Gas Conversion Kit Note: If parts are missing or damaged, call the number or write to the address listed on the inside back cover. General Information Overall Dimensions Width (Side to Side) Depth (Front to Back) Height (Top to Bottom) 30" Models 31" (788 mm) 21 1/4" (540 mm) 3 13/16" (97 mm) 36" Models 37" (940 mm) 21 1/4" (540 mm) 3 13/16" (97 mm) Note: These are overall dimensions NOT cutout dimensions. 6 Preparation Electrical Requirements 9 CAUTION Do not use an extension cord with the gas cooktop. This appliance requires a 60 Hz, 15 Amp, 120 VAC connection. Plan the installation so that the power connection is accessible from the front of the cabinet. Gas Requirements Supply Pressure: ▯ Natural Gas: 7 inches water column (14.9 Millibars) ▯ Propane Gas: 11 inches water column (27.4 Millibars) The propane gas tank must be equipped with its own high pressure regulator in addition to the pressure regulator supplied with this unit. The cooktop is shipped from the factory for use with natural gas. For use with LP conversion, a certified technician or installer must do the conversion. Cabinet Requirements Depth from Back Wall Cabinet 13" (330) max. Centered over cooktop NGM30 - min. 30" (762) NGM36 - min. 36" (914) min. 18" (458) Left Side min. 12" (305) Above counter - min. 30" (762) to combustible surface Rear wall - 2" (51mm) Right Side min. 12" (305) ( )=mm ▯ Instructions are based on standard American cabinets 36" high (91cm) x 24" deep (61cm) with a 25" (63cm) countertop. ▯ The maximum depth of a cabinet installed above the cooktop is 13" (33cm). Note: All measurements given must be precisely followed. If nonstandard cabinets are used, make sure they are installed with minimum dimensions shown. Plan the installation of the unit so that the power cord, gas shut-off valve and gas pressure regulator are accessible from the front of the cabinet.
-
 1
1 -
 2
2 -
 3
3 -
 4
4 -
 5
5 -
 6
6 -
 7
7 -
 8
8 -
 9
9 -
 10
10 -
 11
11 -
 12
12 -
13
-
14
-
15
-
16
-
17
-
18
-
19
-
20
-
21
-
22
-
23
-
24
-
25
-
26
-
27
-
28
-
29
-
30
-
31
-
32
-
33
-
34
-
35
-
36
-
37
-
38
-
39
-
40
 |
 |
