Black & Decker WP900 Instruction Manual - Page 6
Assembly and Adjustment, Before Operation, Using Liquid Wax and Paste Wax, Operation Figs. 5, 6, 7, - random orbit waxer polisher
 |
View all Black & Decker WP900 manuals
Add to My Manuals
Save this manual to your list of manuals |
Page 6 highlights
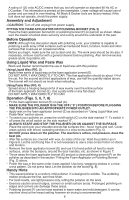
A rating of 120 volts AC/DC means that you tool will operate on standard 60 Hz AC or DC power. This information is printed on the nameplate. Lower voltage will cause loss of power and can result in over-heating. All Black & Decker tools are factory-tested; if this tool does not operate, check the power supply. Assembly and Adjustment CAUTION: Turn off and unplug from power supply. Fitting the foam applicator or polishing bonnet (Fig. 2) Place the foam applicator bonnet (E) or polishing bonnet (F) on pad (A) as shown. Make sure the elastic is tucked down securely and evenly around the underside of the pad. Before Operation NOTE: Although this discussion deals with polishing a car, your polisher is capable of polishing a wide array of flat surfaces such as hardwood floors, furniture, boats and other surfaces that could use an occasional shine. Before you begin, make sure the car is clean and dry. The work area should be dry also. If necessary, remove road tar with a general cleaner before polishing. Also remove excess grease spots, bug stains, etc. Using Liquid Wax and Paste Wax Black and Decker recommends the use of liquid wax with this polisher. Using Liquid Wax (Fig. 3) Apply three swirls of liquid wax on the foam applicator bonnet (E). DO NOT APPLY WAX DIRECTLY TO CAR. This first application should do about 1/4 of the car. For the second and third applications of wax, use half the quantity stated above. The bonnet will not absorb as much when reloading. Using Paste Wax (Fig. 4) Spread about a heaping teaspoonful of wax evenly over the entire surface of the foam applicator bonnet (E). Use a putty knife or any flat object. DO NOT APPLY WAX DIRECTLY TO CAR. Operation (Figs. 5, 6, 7, 8) • Fit the foam applicator bonnet (E) on pad (A). • Make sure the polisher is in the off ("0") position before plugging the polisher into an appropriate power outlet. • Apply wax on the foam applicator bonnet (E) as described on "Using Liquid Wax and Paste Wax" section above. • To switch your polisher on, press the on/off switch (C) on the side marked "l". To switch it off press the on/off switch on the side marked "0". • Always start and stop the polisher on or against the surface. Place the cord over your shoulder and do flat surfaces first - hood, trunk and roof. Cover areas quickly with broad, sweeping strokes in a criss-cross pattern (Fig. 5). • DO NOT press down on the polisher. The machine's action, not pressure, does the best job. • After flat surfaces are covered with wax, do sides of the car. Hold the polisher as in Figure 6. Let the cord hang free. It is not necessary to use a criss-cross motion on doors and fenders. • Remove the foam applicator bonnet (E) and use it to hand polish all hard to reach surfaces, under the bumpers, around the door handles, etc. as shown in Figure 7. • Throw away the foam applicator bonnet (E) and put a clean polishing bonnet (F) on the polisher as described in the section "Fitting the Foam Applicator or Polishing Bonnet (Fig. 2) above. • Polish the wax in the same order it was applied. Use long, sweeping strokes in a crisscross pattern. Do not press hard. Let the polisher do the work(Fig. 8). Handy Hints • This waxer/polisher is a random orbit polisher. it is designed to wobble. The wobbling motion produces the fine, swirl free finish. • For best results, use light pressure only, letting the polisher do the work. • Exercise caution around edges, corners or small surface areas. Prolonged polishing on edges and corners can damage these areas. • Polishing bonnet (F) can be hand washed in warm water and mild detergent. It can be machine dried at the lowest setting however air drying is recommended. 6
-
 1
1 -
 2
2 -
 3
3 -
 4
4 -
 5
5 -
 6
6 -
 7
7 -
 8
8 -
 9
9 -
 10
10 -
 11
11 -
 12
12 -
13
-
14
-
15
-
16
-
17
-
18
-
19
-
20
-
21
-
22
-
23
-
24
 |
 |
