Black & Decker BDASP103 Instruction Manual - Page 6
Assem, Please Note
 |
View all Black & Decker BDASP103 manuals
Add to My Manuals
Save this manual to your list of manuals |
Page 6 highlights
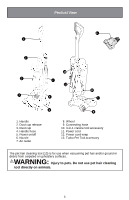
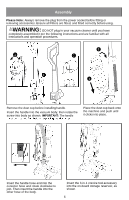
Assembly Please Note: Always remove the plug from the power socket before fitting or removing accessories. Ensure all Filters are fitted, and fitted correctly before using. WARNING: DO NOT plug in your vacuum cleaner until you have completely assembled it per the following instructions and are familiar with all instructions and operation procedures. 2 1 3 2 1 Remove the dust cup before installing handle. Insert the handle into the vacuum body, then rotate the screw into body as shown. IMPORTANT: The handle Place the dust cup back onto the machine and push until it clicks into place. Insert the handle hose end into the conector hose and rotate clockwise to join. Then insert the handle into the other hose of the body. Insert the 3-in-1 crevice tool accessory into the on-board storage reservoir, as shown. 6
-
 1
1 -
 2
2 -
 3
3 -
 4
4 -
 5
5 -
 6
6 -
 7
7 -
 8
8 -
 9
9 -
 10
10 -
 11
11 -
 12
12 -
13
-
14
-
15
 |
 |
