BenQ MH534 User Manual
BenQ MH534 Manual
 |
View all BenQ MH534 manuals
Add to My Manuals
Save this manual to your list of manuals |
BenQ MH534 manual content summary:
- BenQ MH534 | User Manual - Page 1
MS531/MX532/MW533/MH534/MS521H/ TW533/TH534 Digital Projector User Manual V1.02 - BenQ MH534 | User Manual - Page 2
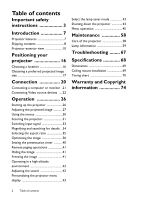
the sound 42 Personalizing the projector menu display 43 Select the lamp saver mode 43 Shutting down the projector 44 Menu operation 45 Maintenance 58 Care of the projector 58 Lamp information 59 Troubleshooting ........ 67 Specifications 68 Dimensions 69 Ceiling mount installation - BenQ MH534 | User Manual - Page 3
on the product. Safety Instructions 1. Please read this manual before 4. you operate your projector. Save it for future reference. Always open the lens shutter or remove the lens cap when the projector lamp is on. 5. In some countries, the line voltage is NOT stable. This projector is 2. Do not - BenQ MH534 | User Manual - Page 4
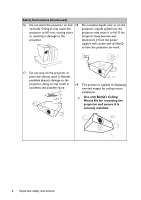
should you ever undo or remove any other covers. Refer servicing only to suitably qualified professional service personnel. 9. Never replace the lamp assembly or any electronic components unless the projector is unplugged. 12. When the projector is under operation, you may sense some heated air - BenQ MH534 | User Manual - Page 5
tilted at an angle of more than 10 degrees left to right, nor at angle of more than 15 degrees front to back. Using the projector when it is not fully horizontal may cause a malfunction of, or damage to, the lamp. 3000 m (10000 feet) 0 m (0 feet) Important safety instructions 5 - BenQ MH534 | User Manual - Page 6
cause it to fail. If the or resulting in damage to the projector does become wet, projector. disconnect it from the power supply's wall socket and call BenQ to have the projector serviced. 17. Do not step on the projector or place any objects upon it. Besides probable physical damage to the - BenQ MH534 | User Manual - Page 7
Restart function enables you to restart the projector immediately within 90 seconds after turning it off. • 3D Function supported Various 3D formats make the 3D function distance. • The lamp brightness will decline over time and may vary within the lamp manufacturers specifications. This is normal - BenQ MH534 | User Manual - Page 8
and may differ from those illustrated. *The warranty card is only supplied in some specific regions. Please consult your dealer for detailed information. Projector Power cord VGA cable QDiugiictkal SPtraortjeGctuoirde Quick start guide Warranty card* Remote control with battery 8 Introduction - BenQ MH534 | User Manual - Page 9
Optional accessories 1. Spare lamp kit 2. Ceiling mount kit 3. Carry bag 4. 3D glasses Introduction 9 - BenQ MH534 | User Manual - Page 10
view Front/upper side 1 2 8 7 3 6 4 5 Rear/lower side 91011 1213 14 15 161718 19 1. External control panel (See "Projector" on page 11 for details.) 2. Lamp cover 3. Vent (air inhale) 4. Focus ring 5. Zoom ring 6. Front IR remote sensor 7. Projection lens 8. Quick-release lever 9. RGB signal - BenQ MH534 | User Manual - Page 11
. Lights 6 12 up or flashes when the lamp has developed a problem. See "Installing 7 8 91011 the dust filter (Optional accessory)" on page 65 for details. 1. Focus ring 7. II POWER Adjusts the focus of the projected Toggles the projector between standby image. See "Fine-tuning the image - BenQ MH534 | User Manual - Page 12
. Volume /Arrow keys ( / Left, / Down) / Right) Manually corrects distorted images Adjusts the sound level. resulting from an angled projection. screws. You can purchase a BenQ projector ceiling mount kit from the place you purchased your BenQ projector. BenQ recommends that you also purchase a - BenQ MH534 | User Manual - Page 13
projector. See "Shutting down the projector" on page 44 for 1. ON details. Turns on the projector. See "Starting up 11. Keystone/Arrow keys ( / Up, the projector" on page 26 for details. / Down) 2. PC 1 Manually Turns on the On-Screen Display 70% lamp power saving. Press again to (OSD) - BenQ MH534 | User Manual - Page 14
determines the best Displays the lamp mode selection bar picture timings for the displayed (Normal/Economic/SmartEco). image. See "Auto-adjusting the image" 20. INFO on page 28 for details. Displays the status information of the 16. Mute Toggles projector audio between on and off - BenQ MH534 | User Manual - Page 15
. • Replace only with the same or equivalent type recommended by the battery manufacturer. • Dispose of the used battery according to the battery manufacturer's instructions. • Never throw a battery into a fire. There may be danger of an explosion. • If the battery is dead or if you will not be - BenQ MH534 | User Manual - Page 16
quick setup and portability. 2. Front Ceiling Select this location with the projector suspended upside-down from the ceiling in front of the screen. Purchase the BenQ Projector Ceiling Mounting Kit from your dealer to mount your projector on the ceiling. Set Front Ceiling in the SYSTEM SETUP: Basic - BenQ MH534 | User Manual - Page 17
page 69 for the center of lens dimensions of this projector before calculating the appropriate position. Diagonal Diagonal Screen H 229 300 7620 6096 4572 11826 12984 14143 274 For example, if your projector is MS531/MX532/MS521H and using a 120-inch screen, the average projection distance - BenQ MH534 | User Manual - Page 18
6350 5385 3365 8346 9181 10016 135 300 7620 6462 4039 10016 11017 12019 162 For example, if your projector is MW533/TW533 and using a 120-inch screen, the average projection distance is 4407 mm and with this row shows that a 150'' (about 4.0 m) screen is required. 18 Positioning your projector - BenQ MH534 | User Manual - Page 19
6641 3736 9271 10253 11234 262 For example, if your projector is MH534/TH534 and using a 120-inch screen, the average projection distance BenQ recommends that if you intend to permanently install the projector, you should physically test the projection size and distance using the actual projector - BenQ MH534 | User Manual - Page 20
Connection When connecting a signal source to the projector, be sure to: 1. Turn all equipment off before making any connections. 2. Use the correct signal cables for each source. 3. Ensure the cables are firmly inserted. 1 2 3 1 - BenQ MH534 | User Manual - Page 21
on the screen, you can connect the MONITOR OUT signal output jack on the projector to an external monitor following the instructions below: To connect the projector to a monitor: 1. Connect the projector to a computer as described in "Connecting a computer" on page 21. 2. Take a suitable VGA cable - BenQ MH534 | User Manual - Page 22
PC jack. • If you wish to use this connection method when the projector is in standby mode, make sure the Monitor Out function is turned on 56 for details. Connecting Video source devices You need only connect the projector to a Video source device using just one of the above connecting methods - BenQ MH534 | User Manual - Page 23
Connecting a HDMI source device The projector provides a HDMI input jack that allows you to connect it to a HDMI source device like a DVD player, a DTV tuner or a display. HDMI (High-Definition Multimedia Interface) supports uncompressed video data transmission between compatible devices like DTV - BenQ MH534 | User Manual - Page 24
can continue with this procedure. • If not, you will need to reassess which method you can use to connect to the device. To connect the projector to a Component Video source device: 1. Take a Component Video to VGA (D-Sub) adaptor cable and connect the end with 3 RCA type connectors to the Component - BenQ MH534 | User Manual - Page 25
also continue with this procedure. • If not, you will need to reassess which method you can use to connect to the device. To connect the projector to an S-Video/Video source device: 1. Take an S-Video/Video cable and connect one end to the S-Video/Video output jack of the Video source - BenQ MH534 | User Manual - Page 26
on the projector lights orange Settings menu, the projector will turn on Settings menu, the projector will turn on automatically when VGA projector or ON on the remote control to start the projector. The POWER flashes and stays orange when the projector projector is still hot from previous - BenQ MH534 | User Manual - Page 27
instructions. 4. If you are prompted for a password, press the arrow keys to enter a six digit password. See "Utilizing the password function" on page 31 for details. 5. Switch all of the connected equipment on. 6. The projector while the lamp is on. The strong light from the lamp may cause damage - BenQ MH534 | User Manual - Page 28
optimize the picture quality. To do this, press AUTO on the projector or remote control. Within 3 seconds, the built-in Intelligent Auto observing the input signal content, or using the test pattern build-in OSD manual from OSD or remote control for better observe the shape changed. • Using - BenQ MH534 | User Manual - Page 29
image is noticeably wider at either the top or bottom. It occurs when the projector is not perpendicular to the screen. To correct this, besides adjusting the height of the projector, you will need to manually correct it following one of these steps. • Using the remot e control Press / on the - BenQ MH534 | User Manual - Page 30
input Status Press MENU to the previous page or to exit. The following example describes how to set the OSD language. 1. Press MENU on the projector or remote control to turn the OSD menu on. 3. Press to highlight Language and press OK. 2. Use / to highlight the SYSTEM SETUP: Basic menu - BenQ MH534 | User Manual - Page 31
if necessary) and write the password you used in this manual, and keep the manual in a safe place for later recall. Setting a password Once a password has been set, the projector cannot be used unless the correct password is entered every time the projector is started. 1. Open the OSD menu and go to - BenQ MH534 | User Manual - Page 32
, or if you did not record the password in this manual, and you absolutely do not remember it, you can use projector or remote control for 3 seconds. The projector will display a coded number on the screen. 2. Write down the number and turn off your projector. 3. Seek help from the local BenQ service - BenQ MH534 | User Manual - Page 33
Source menu is On (which is the default of this projector) if you want the projector to automatically search for the signals. You can also manually cycle through the available input signals. 1. Press Source on the projector or remote control. A source selection bar displays. 2. Press / until your - BenQ MH534 | User Manual - Page 34
the center of the picture. Press the key repeatedly until the picture size is suitable for your need. 3. Use the directional arrows ( , , , ) on the projector or remote control to navigate the picture. 4. To restore the picture to its original size, press AUTO. You can also press ZOOM . When the key - BenQ MH534 | User Manual - Page 35
,and digital TV and DVDs are usually in 16:9 or 16:10 ratio. With the advent of digital signal processing, digital display devices like this projector can dynamically stretch and scale the image output to a different aspect than that of the image input signal. To change the projected image ratio (no - BenQ MH534 | User Manual - Page 36
type. To select an operation mode that suits your need, you can follow one of the following steps. • Press OK on the remote control or projector repeatedly until your desired mode is selected. • Go to the PICTURE > Picture Mode menu and press / to select a desired mode. The picture modes are listed - BenQ MH534 | User Manual - Page 37
below functions may not be available. Based on your needs, you can make adjustments tothese functions by highlighting them and pressing / on the projector or remote control. Adjusting Brightness The higher the value, the brighter the image. And the lower the setting, the darker the image. Adjust - BenQ MH534 | User Manual - Page 38
meter), and provide a set of suitable source images to measure color reproduction. These tools are not provided with the projector, however, your projector supplier should be able to provide you with suitable guidance, or even an experienced professional installer. The Color Management provides - BenQ MH534 | User Manual - Page 39
any image from the disc on the screen and enter the 3D Color Management menu to make adjustments. To adjust the settings: 1. Go to the PICTURE menu and highlight 3D Color Management. 2. Press OK and the 3D Color Management page displays. 3. Highlight Primary Color and press / to select a color - BenQ MH534 | User Manual - Page 40
Setting the presentation timer The presentation timer can indicate the presentation time on the screen to help you achieve better time management when giving presentations. Follow these steps to utilize this function: 1. Go to the SYSTEM SETUP: Basic > Presentation Timer menu and press OK to display - BenQ MH534 | User Manual - Page 41
control to turn off the image for a period of time with up to 70% lamp power saving. Press any key on the projector or remote control to restore the image. • Eco Blank: Save up 70% of your lamp power. Time to do your part in saving the planet. When this function is activated - BenQ MH534 | User Manual - Page 42
between 0 m and 1500 m and ambient temperature is between 0°C and 35°C. The projector will be over cooled, if you turn the mode on under such a condition. solve these symptoms. However, this is not to state that this projector can operate under any and all harsh or extreme conditions. Adjusting the - BenQ MH534 | User Manual - Page 43
. • Fan Speed Mode in the SYSTEM SETUP: Advanced menu is used when the projector is installed a filter cover. Use / to set to High. See "Installing the dust filter (Optional accessory)" on page 65 for details. Select the lamp saver mode • Using the remote control. Press SMART ECO to select Normal - BenQ MH534 | User Manual - Page 44
shuts down, and the fans will continue to run for approximately 90 seconds to cool down the projector. • To protect the lamp, the projector will not respond to any commands during the cooling process. • To shorten the cooling time, you can also activate the Quick Cooling function in the - BenQ MH534 | User Manual - Page 45
Menu operation Menu system Please note that the on-screen display (OSD) menus vary according to the signal type selected. Main menu Sub-menu Options 1. DISPLAY Wall Color Off/Light Yellow/Pink/Light Green/Blue/Blackboard Aspect Ratio Auto/Real/4:3/16:9/16:10 Keystone Position Phase H. - BenQ MH534 | User Manual - Page 46
2. PICTURE 3. Source Picture Mode Bright/Presentation/sRGB/Cinema/(3D)/User 1/ User 2 Reference Mode Bright/Presentation/sRGB/Cinema/(3D) Brightness Contrast Color Tint Sharpness Brilliant Color On/Off Color Temperature Cool/Normal/Warm Color Temperature Fine Tuning R Gain/G Gain/B - BenQ MH534 | User Manual - Page 47
-Left/Bottom-Left/TopRight/Bottom-Right Count Down/Count Up On/Off Yes/No Language Projector Installation 4. SYSTEM SETUP: Basic Menu display Time Menu Settings Menu Position Reminder message Direct hrs/4 hrs/8 hrs/12 hrs Reset/Cancel Yes/No BenQ/Black/Blue/Purple BenQ/Black/Blue Operation 47 - BenQ MH534 | User Manual - Page 48
Cancel Native Resolution 6. INFORMA TION Current System Status Source Picture Mode Resolution Lamp Mode 3D Format Color System Equivalent Lamp Hour Firmware Version Note that the menu items are available when the projector detects at least one valid signal. If there is no equipment connected - BenQ MH534 | User Manual - Page 49
1. DISPLAY menu Description of each menu • The default values listed in this manual, especially on pages 49-57, are for reference only. They may vary between the projectors due to the continuous improvement to the products. FUNCTION Wall Color Aspect Ratio Keystone Position DESCRIPTION Corrects - BenQ MH534 | User Manual - Page 50
a 3D mode. 3D Sync Invert When you discover the inversion of the image depth, enable this function to correct the problem. Save 3D Settings The projector will memorize the current 3D settings. Apply 3D Settings The projector will apply saved 3D settings and keep these settings when you reboot the - BenQ MH534 | User Manual - Page 51
2. PICTURE menu FUNCTION DESCRIPTION Pre-defined picture modes are provided so you can optimize your Picture Mode projector image set-up to suit your program type. See "Selecting a picture mode" on page 36 for details. Reference Mode Selects a picture mode that best suits - BenQ MH534 | User Manual - Page 52
2. PICTURE menu FUNCTION DESCRIPTION Brilliant Color See "Adjusting Brilliant Color" on page 37 for details. Color See "Selecting a Color Temperature" on page 38 for details. Temperature Color See "Setting a preferred color temperature" on page 38 for Temperature details. Fine Tuning 3D - BenQ MH534 | User Manual - Page 53
: Basic menu FUNCTION Presentation Timer Language Projector Installation Menu Settings DESCRIPTION Reminds the presenter On-Screen Display (OSD) menus. See "Using the menus" on page 30 for details. The projector can be installed on a ceiling or behind a screen, or with one or more mirrors. See - BenQ MH534 | User Manual - Page 54
will turn on automatically when VGA signal is detected. Selecting Off the projector has to be turnned on manually (by keypad or remote). See "Starting up the projector" on page 26 for details. Auto Power Off Allows the projector to turn off automatically if no input signal is detected after a set - BenQ MH534 | User Manual - Page 55
Settings Lamp Settings Security Settings Baud Rate Test Pattern Selecting High when the projector is projector using a suitable RS-232 cable and update or download the projector's firmware. This function is intended for qualified service personnel. Selecting On enables the function and the projector - BenQ MH534 | User Manual - Page 56
the standby power consumption. The Standby Monitor Out only works when an appropriate D-Sub input is made to the PC jack. Audio Pass Through The projector can play sound when it is in standby mode and the corresponding jacks are correctly connected to devices. Press / to choose the source that you - BenQ MH534 | User Manual - Page 57
Status DESCRIPTION Shows the native resolution of the projector. Source Shows the current signal source. Picture Mode Shows the selected mode in the PICTURE menu. Resolution Shows the supported resolution of the input signal. Lamp Mode Shows the current lamp mode. 3D Format Shows the current 3D - BenQ MH534 | User Manual - Page 58
of the projector except the lamp. Contact your projector If you need to store the projector for an extended time, please follow the instructions below: • Make sure the temperature and humidity of the storage area are within the recommended range for the projector. Please refer to "Specifications - BenQ MH534 | User Manual - Page 59
Y= lamp life spec of Eco mode Z= lamp life spec of SmartEco mode A' is the longest lamp life spec amoung X, Y, Z See "Setting Lamp mode" below for more information on Economic mode. The lamp hour in Economic and SmartEco is calculated shorter of that in Normal mode. That is, using the projector in - BenQ MH534 | User Manual - Page 60
depending on the content brightness level Setting Auto Power Off This function allows the projector to turn off automatically if no input source is detected after a set period of time to prevent unnecessary waste of lamp life. To set Auto Power Off, go into the SYSTEM SETUP: Basic > Auto Power - BenQ MH534 | User Manual - Page 61
below are for reference only. Please follow the actual on-screen instructions to prepare and replace the lamp. Status Message Install a new lamp for optimal performance. If the projector is normally run with Economic selected ("Setting Lamp mode" on page 59), you may continue to operate the - BenQ MH534 | User Manual - Page 62
hazardous waste regulations to dispose of this lamp in a proper manner. • To assure optimal performance from the projector, it is recommended that you purchase a BenQ projector lamp for lamp replacement. • Ensure good ventilation when handling broken lamps. We recommend that you use respirators - BenQ MH534 | User Manual - Page 63
in locations where water might splash on it, children can reach it, or near flammable materials. • Do not insert your hands into the projector after the lamp is removed. If you touch the optical components inside, it could cause color unevenness and distortion of the projected images. 6. Insert the - BenQ MH534 | User Manual - Page 64
screw may cause a bad connection, which could result in malfunction. • Do not over tighten the screw. 11. Restart the projector. Do not turn the power on with the lamp cover removed. Resetting the lamp timer 12. After the startup logo, open the On- Screen Display (OSD) menu. Go to the SYSTEM SETUP - BenQ MH534 | User Manual - Page 65
to heat excessively leading to pre-mature lamp and/ or projector failure. 5. If the dirt is difficult to remove or the filter is broken, please contact your local dealer or service center to obtain a new filter. 6. Reset filter timer after a new filter is replaced. Go to SYSTEM SETUP: Basic - BenQ MH534 | User Manual - Page 66
Download Off Red CW start fail Burn-In Messages Off Green Off Burn-in ON Green Burn-in OFF Lamp Error Messages Off Red Lamp1 error in normal operation Off Orange Flashing Lamp is not lit up Thermal Error Messages Red Red Flashing Red Red Flashing Green Green Flashing Off Fan 1 error - BenQ MH534 | User Manual - Page 67
Troubleshooting The projector does not turn on. Cause Remedy There is no power from the power cable. Attempting to turn the projector on again during the cooling process. Plug the power cord into the AC inlet on the projector, and plug the power cord into the power outlet. If the power outlet - BenQ MH534 | User Manual - Page 68
MS531/MX532/MS521H: 106±5% MW533/TW533: 104±5% MH534/TH534: 107±5% Zoom ratio 1.2X Lamp 203 W lamp Electrical Power supply AC100-240V, 2.60 A, 50- service contact window. http://www.benq.com/welcome Lamp life results will vary depending on environmental conditions and usage. 68 Specifications - BenQ MH534 | User Manual - Page 69
241.3 99 Dimensions 332.4 mm (W) x 99 mm (H) x 241.3 mm (D) 332.4 Ceiling mount installation Ceiling mount screw: M4 (Max L = 25 mm; Min L=20 mm) Unit: mm 242 228 60.6 127.7 149.5 84 626.9 577.7 537.9 89.1 166.2 332.4 Specifications 69 - BenQ MH534 | User Manual - Page 70
Timing chart 1. VGA Analog Supported timing for PC input .5 ◎ Blanking) 1152 x 864 1152 x 864_75 75 67.5 108 BenQ 1024 x 576 Notebook 60 35.82 46.966 Timing BenQ 1024 x 600 Notebook 64.995 41.467 51.419 Timing 1280 x 59.978 65.317 121.750 ◎ ◎ 70 Specifications - BenQ MH534 | User Manual - Page 71
.25 74.25 74.25 74.25 74.25 74.25 148.5 148.5 3D Field Sequential ◎ ◎ ◎ 2. HDMI Digital Supported timing for PC input Resolution 640 x 480 720 x 400 800 x 600 Timing VGA_60 VGA_72 VGA_75 VGA_85 720 x 400_70 SVGA_60 .000 28.3221 40.000 50.000 49.500 56.250 ◎ ◎ ◎ 83.000 ◎ Specifications 71 - BenQ MH534 | User Manual - Page 72
XGA_85 XGA_120 (Reduce Blanking) 1152 x 864_75 BenQ Notebook Timing BenQ Notebook Timing 1280 x 720_60 1280 x ◎ ◎ ◎ ◎ ◎ ◎ ◎ ◎ ◎ ◎ ◎ ◎ The timings showing above may not be supported due to EDID file and VGA graphic card limitations. It is possible that some timings cannot be chosen. - BenQ MH534 | User Manual - Page 73
74.25 74.25 74.25 74.25 74.25 74.25 148.5 148.5 ◎ ◎ ◎ ◎ ◎ ◎ Supported timing for Video input Video mode NTSC PAL SECAM PAL-M PAL-N PAL-60 NTSC4.43 Horizontal Frequency (kHz) 15 4.43 4.25 or 4.41 3.58 3.58 4.43 4.43 ◎ ◎ ◎ ◎ ◎ ◎ ◎ ◎ ◎ ◎ ◎ ◎ 3D Field Sequential ◎ Specifications 73 - BenQ MH534 | User Manual - Page 74
product in accordance with BenQ's written instructions, especially the ambient humidity must be in-between 10% and 90%, temperature in-between 0°C and 35°C, altitude lower than 4920 feet, and avoiding to operate the projector in a dusty environment. This warranty gives you specific legal rights, and
-
 1
1 -
 2
2 -
 3
3 -
 4
4 -
 5
5 -
 6
6 -
 7
7 -
8
-
9
-
10
-
11
-
12
-
13
-
14
-
15
-
16
-
17
-
18
-
19
-
20
-
21
-
22
-
23
-
24
-
25
-
26
-
27
-
28
-
29
-
30
-
31
-
32
-
33
-
34
-
35
-
36
-
37
-
38
-
39
-
40
-
41
-
42
-
43
-
44
-
45
-
46
-
47
-
48
-
49
-
50
-
51
-
52
-
53
-
54
-
55
-
56
-
57
-
58
-
59
-
60
-
61
-
62
-
63
-
64
-
65
-
66
-
67
-
68
-
69
-
70
-
71
-
72
-
73
-
74
 |
 |

Digital Projector
User Manual
MS531/MX532/MW533/MH534/MS521H/
TW533/TH534
V1.02