BenQ EX3501R User Manual
BenQ EX3501R Manual
 |
View all BenQ EX3501R manuals
Add to My Manuals
Save this manual to your list of manuals |
BenQ EX3501R manual content summary:
- BenQ EX3501R | User Manual - Page 1
EX Series LCD Monitor User Manual - BenQ EX3501R | User Manual - Page 2
form or by any means, electronic, mechanical, magnetic, optical, chemical, manual or otherwise, without the prior written permission of BenQ Corporation. All other logos, products, or company names mentioned in this manual are the registered trademarks or copyrights of their respective owners, and - BenQ EX3501R | User Manual - Page 3
REPLACED BY AN INCORRECT TYPE. DISPOSE OF USED BATTERIES ACCORDING TO THE INSTRUCTIONS. For models with adapter: • Use only the power adapter supplied with to a proper power source. • Do not attempt to service the power adapter. There are no service parts inside. Replace the unit if it is damaged or - BenQ EX3501R | User Manual - Page 4
that the wall material and the standard wall mount bracket (purchased separately) are stable enough to support the weight of the monitor. • Turn contact qualified service personnel for servicing. • Contact your place of purchase or visit the local website from www.BenQ.com for more support. Caution - BenQ EX3501R | User Manual - Page 5
mount set (purchased separately 17 Precautions ...17 Getting the most from your BenQ Monitor 19 How to install the monitor driver on a new computer 20 How to upgrade the monitor driver Picture Advanced menu ...35 Audio menu ...38 System menu ...39 Troubleshooting ...43 Frequently asked questions (FAQ - BenQ EX3501R | User Manual - Page 6
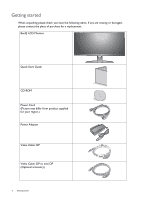
please check you have the following items. If any are missing or damaged, please contact the place of purchase for a replacement. BenQ LCD Monitor Quick Start Guide CD-ROM Power Cord (Picture may differ from product supplied for your region.) Power Adapter Video Cable: DP Video Cable: DP to - BenQ EX3501R | User Manual - Page 7
Video Cable: HDMI USB Cable: USB-C™ Audio Cable (Optional accessory) Back Cover VESA Wall Mount Transfer Kit (Optional accessory) • Available accessories and the pictures shown here may differ from the actual contents and the product supplied for your region. And - BenQ EX3501R | User Manual - Page 8
Getting to know your monitor Front view 1. Light sensor 2. Power button / Power LED indicator 3. Control buttons Back view 1 23 4. DC power input jack 5. Headphone jack 6. HDMI sockets 7. DisplayPort socket 8. USB 3.0 ports 9. USB-C™ port 10. Cable management hole 11. Kensington lock slot 45 6 - BenQ EX3501R | User Manual - Page 9
Connections The following connection illustrations are for your reference only. For cables that are not supplied with your product, you can purchase them separately. For detailed connection methods, see page 11. • If USB-C™ Alternate mode (DP Alt mode) is enabled, USB 2.0 is available from the USB - BenQ EX3501R | User Manual - Page 10
. Do not plug-in or turn-on the power to the monitor until instructed to do so. • The following illustrations are for your reference only. The input and output jacks may vary depending on the purchased model. • The supported timing may vary by input signal. Refer to the "Preset display modes" - BenQ EX3501R | User Manual - Page 11
It allows signal, audio, and transmission from the laptop to the monitor. The USB-C™ port on the monitor transfers data only and does not support power delivery to the laptop. Additional power supply to the connected laptop is required. Due to USB-C™ technology limitation, the USB transmission speed - BenQ EX3501R | User Manual - Page 12
5. Connect the headphone. Pass the cable through the cable management hole on the stand arm first. You may connect headphones to the headphone jack found on the back side of the monitor. 6. Connect USB devices. Connect USB devices via other USB ports (downstream) on the monitor. These downstream USB - BenQ EX3501R | User Manual - Page 13
9. Place the monitor properly. Place the monitor as desired after the cables have been connected properly. Move the monitor carefully by holding lower part of monitor, the base or the stand arm. Finger pressure on the screen surface is prohibited. The screen may be damaged by excessive force. 10. - BenQ EX3501R | User Manual - Page 14
by pressing the power button on the monitor. Turn on the computer too, and follow the instructions in Getting the most from your BenQ Monitor on page 19 to install the monitor software. To extend the service life of the product, we recommend that you use your computer's power management function. 14 - BenQ EX3501R | User Manual - Page 15
tilt the monitor, see Tilt the monitor. on page 13. 3. Remove the back cover. Remove the back cover from its bottom as illustrated. Follow the instructions in Establish a video cable connection. on page 11 and change connected cables. Re-install the back cover as - BenQ EX3501R | User Manual - Page 16
Adjusting the monitor height To adjust the monitor height, hold both the left and the right sides of the monitor to lower the monitor or lift it up to the desired height. Avoid finger pressure on the screen surface. Excessive force on the display is prohibited. Avoid placing hands on the upper or - BenQ EX3501R | User Manual - Page 17
Should you need the VESA wall mount transfer kit, please contact BenQ service. Before starting to install the monitor wall mount set, please read Ensure that the wall material and the standard wall mount set (purchased separately) are stable enough to support the weight of the monitor. Refer to the - BenQ EX3501R | User Manual - Page 18
the instruction manuals of the wall mount bracket you purchased to complete the installation. Use four M4 x 10 mm screws to fix a VESA standard wall mount bracket to the monitor. Make sure that all screws are tightened and secured properly. Consult a professional technician or BenQ service for - BenQ EX3501R | User Manual - Page 19
point, click the Have Disk button, insert the BenQ LCD Monitor CD-ROM and select the appropriate monitor model. Further details and step-by-step instructions for either an automatic (new) or upgrade (existing) installation, see: • How to install the monitor driver on a new computer on page 20. • How - BenQ EX3501R | User Manual - Page 20
How to install the monitor driver on a new computer This instruction details the procedure for selecting and installing the BenQ LCD Monitor driver software on a new computer which has never had a monitor driver installed before. This instruction is only suitable for a computer which has never been - BenQ EX3501R | User Manual - Page 21
driver on an existing computer This instruction details the procedure for manually updating the existing monitor driver software on your Microsoft Windows computer. It is currently tested as compatible for Windows 10, Windows 8 (8.1), and Windows 7 Operating System (OS). The BenQ LCD Monitor driver - BenQ EX3501R | User Manual - Page 22
your monitor from the menu. 2. Select Properties from the menu. 3. Click the Hardware tab. 4. Click Generic PnP Monitor, and then the Properties button. 5. Click the Driver tab and the Update Driver button. 6. Insert the BenQ LCD Monitor CD-ROM into a CD drive on the computer. 7. In the Update - BenQ EX3501R | User Manual - Page 23
your monitor from the menu. 2. Select Properties from the menu. 3. Click the Hardware tab. 4. Click Generic PnP Monitor, and then the Properties button. 5. Click the Driver tab and the Update Driver button. 6. Insert the BenQ LCD Monitor CD-ROM into a CD drive on the computer. 7. In the Update - BenQ EX3501R | User Manual - Page 24
your monitor from the menu. 2. Select Properties from the menu. 3. Click the Hardware tab. 4. Click Generic PnP Monitor, and then the Properties button. 5. Click the Driver tab and the Update Driver button. 6. Insert the BenQ LCD Monitor CD-ROM into a CD drive on the computer. 7. In the Update - BenQ EX3501R | User Manual - Page 25
How to adjust your monitor The control panel No. Name 1. Power key 2. Control keys 1 2 Description Turns the power on or off. Accesses the functions or menu items displayed on the screen, right next to each key. How to adjust your monitor 25 - BenQ EX3501R | User Manual - Page 26
Basic menu operation All OSD (On Screen Display) menus can be accessed by the control keys. You can use the OSD menu to adjust all the settings on your monitor. 1 2 4 3 1. Press any of the control keys. 2. The hot key menu is displayed. The keys numbered , , and are custom keys and are - BenQ EX3501R | User Manual - Page 27
can be accessed by this key. A pop-up message will appear, showing that the setup is complete. Working with HDR technology • Your monitor supports HDR10 technology. • The information regarding HDR-compatible devices and content in this document is most up-to-date at the time of publication. For - BenQ EX3501R | User Manual - Page 28
mode. Refer Working with HDR technology on page 27 to check if a supported player, content, and the certified cable are used. Adjusting display mode To display are suitable for different types of images. See Picture Mode on page 35 for all the available picture modes. Go to Picture Advanced and - BenQ EX3501R | User Manual - Page 29
that are not available will become grayed out. Refer to the following table to find your main source and its supporting second sources. To find out the supported incoming display mode (input timing), please read the "Preset display modes" section from the link "Adjusting the Screen Resolution" on - BenQ EX3501R | User Manual - Page 30
information on each menu, please refer to the following pages: • Display menu on page 31 • Picture menu on page 33 • Picture Advanced menu on page 35 • Audio menu on page 38 • System menu on page 39 30 Navigating the main menu - BenQ EX3501R | User Manual - Page 31
Display menu Available menu options may vary depending on the input sources, functions and settings. Menu options that are not available will become grayed out. Keys that are not available will be disabled and the corresponding OSD icons will disappear. For models without certain functions, their - BenQ EX3501R | User Manual - Page 32
Item Input Function Range Mode Sets the PIP or PBP mode. PIP: the Picture-in-Picture (PIP) mode displays the main video source on the screen while the second source in an inset window. PBP: Allows to display images from two different video sources side-by-side. OFF: Disables PIP/PBP mode. • PIP - BenQ EX3501R | User Manual - Page 33
Picture menu Available menu options may vary depending on the input sources, functions and settings. Menu options that are not available will become grayed out. Keys that are not available will be disabled and the corresponding OSD icons will disappear. For models without certain functions, their - BenQ EX3501R | User Manual - Page 34
Item Function Range Gamma Adjusts the tone luminance. The default value is 3 (the • 1 standard value for Windows). • 2 • 3 • 4 • 5 Color Normal Temperature Allows video and still photographs to be viewed with natural coloring. This is the factory default color. Bluish Applies a cool - BenQ EX3501R | User Manual - Page 35
For better color matching representation with the peripheral devices, such as printers, digital cameras, etc. Photo For viewing still images. Range Navigating the main menu 35 - BenQ EX3501R | User Manual - Page 36
Item Color Vibrance Low Blue Light Function Range Gamer1 For playing car racing games. Gamer2 For playing CS:GO games. Gamer3 For playing Battlefield games. Custom 1 Custom 2 Applies a combination of color settings defined by users. Provides different sets of color settings. Once applied, - BenQ EX3501R | User Manual - Page 37
Item Function Range HDMI RGB PC Range B.I.+ (Bright Intelligence Plus) Determines the range of color scales. Select an option that • Auto matches the RGB range setting on the connected HDMI device. Detect • RGB (0 ~ 255) • RGB (16 ~ 235) Turns the Bright Intelligence Plus function on or off - BenQ EX3501R | User Manual - Page 38
Audio menu Available menu options may vary depending on the input sources, functions and settings. Menu options that are not available will become grayed out. Keys that are not available will be disabled and the corresponding OSD icons will disappear. For models without certain functions, their - BenQ EX3501R | User Manual - Page 39
System menu Available menu options may vary depending on the input sources, functions and settings. Menu options that are not available will become grayed out. Keys that are not available will be disabled and the corresponding OSD icons will disappear. For models without certain functions, their - BenQ EX3501R | User Manual - Page 40
Item Function Range OSD Settings Language Sets the OSD menu language. The language options displayed on your OSD may differ from those shown on the right, depending on the product supplied in your region. Display Time Adjusts the display time of the OSD menu. • English • Français • Deutsch • - BenQ EX3501R | User Manual - Page 41
Volume • Contrast • ON • OFF DDC/CI, short for Display Data Channel/Command Interface, which was developed by Video Electronics Standards Association (VESA). DDC/CI capability allows monitor controls to be sent via the software for remote diagnostics. USB-C Configuration Sets the refresh rate of - BenQ EX3501R | User Manual - Page 42
Item Function Range Information DisplayPort Reset All Displays the current monitor property settings. • Input • Current Resolution • Optimum Resolution (best with the monitor) • HDR • Model Name Selects an appropriate DP standard for data transmission. • 1.1 • 1.4 Resets all mode, color and - BenQ EX3501R | User Manual - Page 43
the signal cable connectors. If any pin is bent or broken off, please contact your dealer to get necessary support. The image is distorted, flashes or flickers. Read the instructions on the link "Adjusting the Screen Resolution" on the CD, and then select the correct resolution, refresh rate and - BenQ EX3501R | User Manual - Page 44
the signal cable connectors. If any pin is bent or broken off, please contact your dealer to get necessary support. • If the LED is off, check the power supply mains socket, the external power supply and the connected to the monitor, the built-in speakers are automatically muted.) 44 Troubleshooting - BenQ EX3501R | User Manual - Page 45
on page 27 to check if a supported player, content, and the certified cable are used. Need more help? If your problems remain after checking this manual, please contact your place of purchase or visit the local website from www.BenQ.com for more support and local customer service. Troubleshooting 45
-
 1
1 -
 2
2 -
 3
3 -
 4
4 -
 5
5 -
 6
6 -
 7
7 -
8
-
9
-
10
-
11
-
12
-
13
-
14
-
15
-
16
-
17
-
18
-
19
-
20
-
21
-
22
-
23
-
24
-
25
-
26
-
27
-
28
-
29
-
30
-
31
-
32
-
33
-
34
-
35
-
36
-
37
-
38
-
39
-
40
-
41
-
42
-
43
-
44
-
45
 |
 |

EX Series
LCD Monitor
User Manual