Actiontec MyWirelessTV Wireless HD Receiver Installation Guide - Page 2
MyWirelessTV - mywirelesstv wireless hd transmitter and receiver kit
 |
View all Actiontec MyWirelessTV Wireless HD Receiver manuals
Add to My Manuals
Save this manual to your list of manuals |
Page 2 highlights
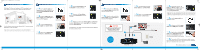
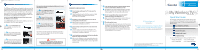
MWTVrx_QS3_QS sngl pnl 9/13/11 4:40 PM Page 2 D Setting Up IR Control (Optional) The IR Blaster and IR Receiver work together to let you control the source device (the device to which you connected the Transmitter: DVR, Blu-ray Player, etc.) from the Receiver location, whether it's in the next room, or on the other side of the house. For example, if your source device is in the living room, and you've set up your MyWirelessTV in your bedroom, the IR Blaster/Receiver allows you to control the source device from your bedroom. If you are using the MyWirelessTV Kit in the same room, the IR Blaster is not needed. Use an IR Extender cable if the receiver is hidden or you want it to be hidden. Use of this cable is optional. 3 Step a Get the IR Extender cable (with the green connector) from the MyWirelessTV kit. 3 Step b Plug the IR Extender cable's green connector into the Green port on the back of the Receiver. 3 Step c Remove the protective covering of the doublestick tape and attach the flat end of the IR Extender cable to the front corner of the HDTV bezel or frame. Part No: 0530-0665-000 QS1155/0811 You may have already installed the IR Blaster. If so, you may skip this section. 4 Step a Get the IR Blaster cable from the original MyWirelessTV Transmitter/ Receiver kit. The IR Blaster cable has a black connector. 4 Step b Plug the IR Blaster cable's black connector into the Transmit port on the back of the Transmitter. 4 Step c Place the flat end of the IR Blaster cable in front (not directly over) of the remote sensor of the source device. Your HDTVs and cable/satellite box should be connected as shown in the previous diagram. You can now start enjoying HDTV anywhere you want it! CAUTION RISK OF EXPLOSION IF REMOTE CONTROL BATTERY IS REPLACED BY AN INCORRECT TYPE. DISPOSE OF USED BATTERIES ACCORDING TO THE INSTRUCTIONS. E Troubleshooting FREQUENTLY ASKED QUESTIONS Q 1 I'm not seeing anything on the TV screen near the Transmitter. A Check the cable connection from the source (i.e. Cable/ Satellite Set Top Box) to the Transmitter and from Transmitter out to the HDTV. Q 2 My cables are connected properly, but I'm still not seeing video on my TV screen. A Make sure the source device is powered on and the correct source input is selected on your HDTV. Q 3 I'm not seeing anything on the TV screen next to the Receiver. A Check the cable connection from the MyWirelessTV Receiver out to the HDTV. Also, make sure the correct source input is selected on the HDTV. Q 4 I can't control my source device (Set Top Box, Blu-Ray Player, etc.) from my 2nd HDTV. A Make sure the IR blaster sensor is pointed directly to the source device's IR (infrared) window. Also make sure the Receiver or the IR Extender cable is in line-of-sight of the remote control. Q 5 I can't change my channel or volume with the remote control included with the MyWirelessTV Kit. A The MyWirelessTV remote control provided is intended for switching multiple input, pairing configuration, and software update. It is not a universal remote control. Q 6 I do not see any video when I connect to my PC/ Laptop with HDMI to the MyWirelessTV. A Make sure the HDMI output display is selected from your PC/Laptop. Refer to your PC/Laptop's user manual. Q 7 The video quality is poor. A You may need to adjust the orientation of the Transmitter and Receiver. Use the Wireless Power Indicator to improve the wireless signal between the two devices. You may want to try orienting the Transmitter and Receiver fronts to be pointing more directly at eachother. To learn more, see the MyWirelessTV user manual. For Technical Support call 1-888-436-0657 How to Videos, User Manuals, Wall Mount Templates, Software Updates and other information are available Online at https://www.actiontec.com/products/product.php?pid=219 © 2011 Actiontec Electronics, Inc. Actiontec, Actiontec Installation Buddy, Creative Solutions for the Digital Life, and the Actiontec logo are trademarks or registered trademarks of Actiontec Electronics, Inc. in the U.S. or other countries. All other names are properties of their respective owners. Product photo may differ from actual product, however functionality remains as stated above. Specifications are subject to change without notice. Multi-Room Wireless HD Receiver MyWirelessTV Model # MWTV200R Quick Start Guide This Quick Start Guide will walk you through the easy steps to set up MyWirelessTV. During this process, we'll show you how to connect a third HDTV to an existing MyWirelessTV HD Transmitter. A How MyWirelessTV Works B Pair New Receiver to Existing Transmitter C Connect the Cables D Setting Up IR Control E Troubleshooting You will need the following items from your MyWirelessTV kit: • Wireless HD Receiver • One (1) Power Supply • One (1) HDMI Cable • One (1) IR Extender Cable NEXT
-
 1
1 -
 2
2
 |
 |
