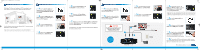
Actiontec MyWirelessTV Wireless HD Receiver Installation Guide
Actiontec MyWirelessTV Wireless HD Receiver Manual
 |
View all Actiontec MyWirelessTV Wireless HD Receiver manuals
Add to My Manuals
Save this manual to your list of manuals |
Actiontec MyWirelessTV Wireless HD Receiver manual content summary:
- Actiontec MyWirelessTV Wireless HD Receiver | Installation Guide - Page 1
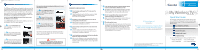
HDTV anywhere in your home because it transmits your video and audio wirelessly. B Pair New Receiver to Existing Transmitter 1 Step Get the power supply and Receiver from the box and place them near the existing MyWirelessTV HD Transmitter. 2 Step Plug the smaller end of the power supply into the - Actiontec MyWirelessTV Wireless HD Receiver | Installation Guide - Page 2
HDTV to an existing MyWirelessTV HD Transmitter. A How MyWirelessTV Works B Pair New Receiver to Existing Transmitter C Connect the Cables D Setting Up IR Control E Troubleshooting You will need the following items from your MyWirelessTV kit: • Wireless HD Receiver • One (1) Power Supply
-
 1
1 -
 2
2
 |
 |
MyWirelessTV allows you to place an HDTV anywhere in your
home because it transmits your video and audio wirelessly.
Use this Receiver to connect an additional HDTV to your existing
MyWirelessTV HD Transmitter.
Congratulations! You have successfully paired the new Receiver
to the existing Transmitter.
A
How MyWirelessTV Works
Step
2
Plug the
smaller end
of the
power supply
into the
5VDC port
on
the back of the
Receiver
.
Step
3
Plug the
larger end
of the
power supply
into a
power outlet
.
Step
1
Get the
power supply
and
Receiver
from the box and place them
near the
existing MyWirelessTV HD
Transmitter
.
B
Pair New Receiver to Existing Transmitter
Step
2
d
Turn on the HDTV near the Receiver. Make sure you
have selected the correct source input on the TV. You should be
able to see video from the source device.
Step
4
Make sure the
Power Light
on the
Receiver
is
SOLID Green
.
Step
7
Wait 40-45 seconds. The
Power Light
on the
Receiver
should be
SOLID Green
and the
Sync Light
on the
Receiver
should be
Blinking Green
.
Step
5
Press the
Sync button
on the
new
Receiver
for at least 5 seconds.
Step
6
Now press the
Sync button
on the existing
Transmitter
for at least
5 seconds.
Step
1
b
Plug the smaller end of the
power supply
into the
5VDC port
on
the back of the
Receiver
.
Step
1
c
Plug the larger end of the
power supply
into a
power outlet
.
Step
1
a
Unplug the new
Receiver
and its
power supply
. Go to the HDTV
that you want to connect.
Step
1
d
Make sure the
Power Light
on the
Receiver
is
SOLID Green
.
Step
1
e
Wait 30-45 seconds. The
Power
and
Wireless Lights
should be
SOLID Green
, and the
Sync Light
should be
Blinking Green
.
Flip this Quick Start Guide over to continue
NEXT
Note:
Only use power adapter, Leader Electronics Inc., Model MU12-G050200-A1
Note:
If the Sync Light is SOLID Orange, wait another 10-15 seconds. It should turn
GREEN. If the Sync Light stays SOLID Orange you will need to manually pair the units
again. If the Sync Light is Blinking Red the units can’t connect or are out-of-range.
RECEIVER
MWTV200R
(Optional)
HDTV
POWER
OUTLET
1
2
3
Please refer to
this illustration
while connecting
cables
Step
2
a
Get the
HDMI cable
from
MyWirelessTV Kit.
Step
2
b
Plug one end of this
HDMI
cable
into an
HDMI port
on the
HDTV
.
Step
2
c
Plug the other end of the
HDMI
cable
into the
HDMI Out to TV port
on
the back of the
Receiver
. The HDTV
should now be connected to the Receiver.
CAUTION
Do NOT place the MyWirelessTV
Receiver on top of or near a
heat-generating source.
C
Connect the Cables
MWTVrx_QS3_QS sngl pnl
9/13/11
4:40 PM
Page 1