Acer Chromebook Spin 511 R753TN Lifecycle Extension Guide - Page 13
Touchpad Module Removal
 |
View all Acer Chromebook Spin 511 R753TN manuals
Add to My Manuals
Save this manual to your list of manuals |
Page 13 highlights
Touchpad Module Removal 0 Prerequisite: Battery Removal 1. Release the latch and disconnect the keyboard FPC from the mainboard connector (A) (Figure 1-9). A Figure 1-9. Touchpad Module Removal 2. Detach the adhesive tape (B) securing the touchpad FFC to the touchpad module. Then detach another adhesive tape from the opening on the keyboard compartment (for keyboard FPC routing) (Figure 1-10). B B Figure 1-10. Touchpad Module Removal Disassembly Procedures 1-11
-
 1
1 -
2
-
3
-
4
-
5
-
6
-
7
-
 8
8 -
 9
9 -
 10
10 -
 11
11 -
 12
12 -
 13
13 -
 14
14 -
 15
15 -
 16
16 -
 17
17 -
 18
18 -
19
-
20
-
21
-
22
-
23
-
24
-
25
-
26
-
27
-
28
-
29
-
30
-
31
-
32
-
33
-
34
 |
 |

Disassembly Procedures
1-11
Touchpad Module Removal
0
Prerequisite:
Battery Removal
1.
Release the latch and disconnect the keyboard FPC from the mainboard connector
(A) (
Figure 1-9
).
Figure 1-9.
Touchpad Module Removal
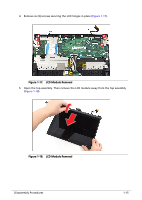
2.
Detach the adhesive tape (B) securing the touchpad FFC to the touchpad module.
Then detach another adhesive tape from the opening on the keyboard compartment
(for keyboard FPC routing) (
Figure 1-10
).
Figure 1-10.
Touchpad Module Removal
A
B
B