2012 Yamaha Motorsports VMAX Owners Manual - Page 74
2012 Yamaha Motorsports VMAX Manual

Page 74 highlights
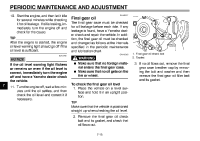
PERIODIC MAINTENANCE AND ADJUSTMENT 3. Remove the air intake duct by removing the bolts. 7. Remove the coolant reservoir cap guard by removing the bolt, and then remove the reservoir cap. 8. Drain the coolant from the coolant reservoir by turning it upside down. 9. Install the coolant reservoir cover and the coolant reservoir by placing them in their original position, and then installing the bolts. 10. Remove the coolant drain screw and its O-ring to drain the cooling system. 2 1 1 1 1. Bolt 2. Air intake duct 1. Radiator cap 6. Remove the coolant reservoir cover and coolant reservoir by removing the bolts. 7 4. Place a container under the engine to collect the used coolant. 5. Remove the radiator cap. WARNING! Never attempt to remove the radiator cap when the engine is hot. [EWA10381] 1 2 2 1 3 1 4 5 1. Coolant drain screw 2. O-ring 1. 2. 3. 4. 5. Bolt Coolant reservoir cap Coolant reservoir cap guard Coolant reservoir cover Coolant reservoir 11. After the coolant is completely drained, thoroughly flush the cooling system with clean tap water. 12. Install the coolant drain screw and its new O-ring. 7-19
-
 1
1 -
2
-
3
-
4
-
5
-
6
-
7
-
8
-
9
-
10
-
11
-
12
-
13
-
14
-
15
-
16
-
17
-
18
-
19
-
20
-
21
-
22
-
23
-
24
-
25
-
26
-
27
-
28
-
29
-
30
-
31
-
32
-
33
-
34
-
35
-
36
-
37
-
38
-
39
-
40
-
41
-
42
-
43
-
44
-
45
-
46
-
47
-
48
-
49
-
50
-
51
-
52
-
53
-
54
-
55
-
56
-
57
-
58
-
59
-
60
-
61
-
62
-
63
-
64
-
65
-
66
-
67
-
68
-
 69
69 -
 70
70 -
 71
71 -
 72
72 -
 73
73 -
 74
74 -
 75
75 -
 76
76 -
 77
77 -
 78
78 -
 79
79 -
80
-
81
-
82
-
83
-
84
-
85
-
86
-
87
-
88
-
89
-
90
-
91
-
92
-
93
-
94
-
95
-
96
-
97
-
98
-
99
-
100
-
101
-
102
-
103
-
104
-
105
-
106
-
107
-
108
-
109
-
110
-
111
-
112
-
113
-
114
-
115
-
116
-
117
-
118
-
119
-
120
-
121
-
122
 |
 |
