2012 Yamaha Motorsports Rhino 700 FI Auto. 4x4 Owners Manual - Page 168
2012 Yamaha Motorsports Rhino 700 FI Auto. 4x4 Manual

Page 168 highlights
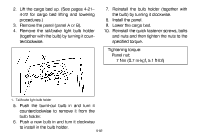
2. Lift the cargo bed up. (See pages 4-21- 4-22 for cargo bed lifting and lowering procedures.) 3. Remove the panel (panel A or B). 4. Remove the tail/brake light bulb holder (together with the bulb) by turning it counterclockwise. 7. Reinstall the bulb holder (together with the bulb) by turning it clockwise. 8. Install the panel. 9. Lower the cargo bed. 10. Reinstall the quick fastener screws, bolts and nuts and then tighten the nuts to the specified torque. Tightening torque: Panel nut: 7 Nm (0.7 m·kgf, 5.1 ft·lbf) 1. Tail/brake light bulb holder 5. Push the burnt-out bulb in and turn it counterclockwise to remove it from the bulb holder. 6. Push a new bulb in and turn it clockwise to install in the bulb holder. 8-59
-
 1
1 -
2
-
3
-
4
-
5
-
6
-
7
-
8
-
9
-
10
-
11
-
12
-
13
-
14
-
15
-
16
-
17
-
18
-
19
-
20
-
21
-
22
-
23
-
24
-
25
-
26
-
27
-
28
-
29
-
30
-
31
-
32
-
33
-
34
-
35
-
36
-
37
-
38
-
39
-
40
-
41
-
42
-
43
-
44
-
45
-
46
-
47
-
48
-
49
-
50
-
51
-
52
-
53
-
54
-
55
-
56
-
57
-
58
-
59
-
60
-
61
-
62
-
63
-
64
-
65
-
66
-
67
-
68
-
69
-
70
-
71
-
72
-
73
-
74
-
75
-
76
-
77
-
78
-
79
-
80
-
81
-
82
-
83
-
84
-
85
-
86
-
87
-
88
-
89
-
90
-
91
-
92
-
93
-
94
-
95
-
96
-
97
-
98
-
99
-
100
-
101
-
102
-
103
-
104
-
105
-
106
-
107
-
108
-
109
-
110
-
111
-
112
-
113
-
114
-
115
-
116
-
117
-
118
-
119
-
120
-
121
-
122
-
123
-
124
-
125
-
126
-
127
-
128
-
129
-
130
-
131
-
132
-
133
-
134
-
135
-
136
-
137
-
138
-
139
-
140
-
141
-
142
-
143
-
144
-
145
-
146
-
147
-
148
-
149
-
150
-
151
-
152
-
153
-
154
-
155
-
156
-
157
-
158
-
159
-
160
-
161
-
162
-
 163
163 -
 164
164 -
 165
165 -
 166
166 -
 167
167 -
 168
168 -
 169
169 -
 170
170 -
 171
171 -
 172
172 -
 173
173 -
174
-
175
-
176
-
177
-
178
-
179
-
180
-
181
-
182
-
183
-
184
-
185
-
186
-
187
-
188
-
189
-
190
 |
 |

8-59
2.
Lift the cargo bed up. (See pages 4-21–
4-22 for cargo bed lifting and lowering
procedures.)
3.
Remove the panel (panel A or B).
4. Remove the tail/brake light bulb holder
(together with the bulb) by turning it coun-
terclockwise.
1.
Tail/brake light bulb holder
5.
Push the burnt-out bulb in and turn it
counterclockwise to remove it from the
bulb holder.
6.
Push a new bulb in and turn it clockwise
to install in the bulb holder.
7.
Reinstall the bulb holder (together with
the bulb) by turning it clockwise.
8.
Install the panel.
9.
Lower the cargo bed.
10.
Reinstall the quick fastener screws, bolts
and nuts and then tighten the nuts to the
specified torque.
Tightening torque:
Panel nut:
7 Nm (0.7 m·kgf, 5.1 ft·lbf)