2012 Yamaha Motorsports RS Venture GT Owners Manual - Page 73
2012 Yamaha Motorsports RS Venture GT Manual

Page 73 highlights
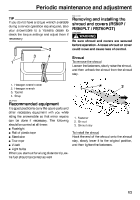
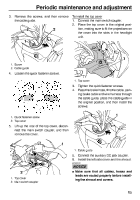
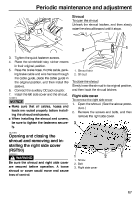
Periodic maintenance and adjustment Shroud To open the shroud Unhook the shroud latches, and then slowly raise the shroud forward until it stops. 2 3. 4. 5. Tighten the quick fastener screws. Place the windshield stay rubber covers in their original position. Pass the brake hose, throttle cable, parking brake cable and wire harness through the cable guide, place the cable guide in the original position, and then install the screws. Connect the auxiliary DC jack coupler. Install the left side cover and the shroud. 1 1. Shroud latch 2. Shroud 6. 7. To close the shroud Slowly lower the shroud to its original position, and then hook the shroud latches. ECS00372 Right side cover To remove the right side cover 1. Open the shroud. (See the above procedure.) 2. Remove the screws and bolts, and then remove the right side cover. NOTICE G G Make sure that all cables, hoses and leads are routed properly before installing the shroud and covers. When installing the shroud and covers, be sure to tighten the fasteners securely. 3 ESU13962 Opening and closing the shroud and removing and installing the right side cover (RST90) EWS00810 WARNING Be sure the shroud and right side cover are secured before operation. A loose shroud or cover could move and cause loss of control. 1 1. Screw 2. Bolt 3. Right side cover 2 1 67
-
 1
1 -
2
-
3
-
4
-
5
-
6
-
7
-
8
-
9
-
10
-
11
-
12
-
13
-
14
-
15
-
16
-
17
-
18
-
19
-
20
-
21
-
22
-
23
-
24
-
25
-
26
-
27
-
28
-
29
-
30
-
31
-
32
-
33
-
34
-
35
-
36
-
37
-
38
-
39
-
40
-
41
-
42
-
43
-
44
-
45
-
46
-
47
-
48
-
49
-
50
-
51
-
52
-
53
-
54
-
55
-
56
-
57
-
58
-
59
-
60
-
61
-
62
-
63
-
64
-
65
-
66
-
67
-
 68
68 -
 69
69 -
 70
70 -
 71
71 -
 72
72 -
 73
73 -
 74
74 -
 75
75 -
 76
76 -
 77
77 -
 78
78 -
79
-
80
-
81
-
82
-
83
-
84
-
85
-
86
-
87
-
88
-
89
-
90
-
91
-
92
-
93
-
94
-
95
-
96
-
97
-
98
-
99
-
100
-
101
-
102
-
103
-
104
-
105
-
106
-
107
-
108
-
109
-
110
-
111
-
112
-
113
-
114
-
115
-
116
-
117
-
118
-
119
-
120
-
121
-
122
-
123
-
124
-
125
-
126
-
127
-
128
-
129
-
130
-
131
-
132
-
133
-
134
-
135
-
136
-
137
-
138
-
139
-
140
-
141
-
142
 |
 |
