2012 Yamaha Motorsports FX Nytro XTX Owners Manual - Page 59
2012 Yamaha Motorsports FX Nytro XTX Manual

Page 59 highlights
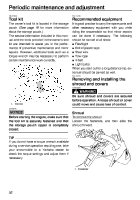
Periodic maintenance and adjustment 2 1 1 1 1 1. Shroud 1. Fastener 2. Left side cover To install the shroud Hook the end of the shroud onto the front cover, insert the projections on the shroud into the slots in the headlight unit stay, and then tighten the fasteners. To install a side cover 1. Insert the projection on the rear of the side cover into the slot in the fuel tank side cover and insert the projections on the front of the side cover into the slots in the lower cover. 1 Left and right side covers To remove a side cover 1. Remove the shroud. (See above for removal procedures.) 2. Loosen the fasteners, and then remove the side cover as shown. 1. Left side cover 2. 3. Tighten the fasteners. Install the shroud. ECS00372 NOTICE G G Make sure that all cables, hoses and leads are routed properly before installing the shroud and covers. When installing the shroud and covers, be sure to tighten the fasteners securely. 53
-
 1
1 -
2
-
3
-
4
-
5
-
6
-
7
-
8
-
9
-
10
-
11
-
12
-
13
-
14
-
15
-
16
-
17
-
18
-
19
-
20
-
21
-
22
-
23
-
24
-
25
-
26
-
27
-
28
-
29
-
30
-
31
-
32
-
33
-
34
-
35
-
36
-
37
-
38
-
39
-
40
-
41
-
42
-
43
-
44
-
45
-
46
-
47
-
48
-
49
-
50
-
51
-
52
-
53
-
 54
54 -
 55
55 -
 56
56 -
 57
57 -
 58
58 -
 59
59 -
 60
60 -
 61
61 -
 62
62 -
 63
63 -
 64
64 -
65
-
66
-
67
-
68
-
69
-
70
-
71
-
72
-
73
-
74
-
75
-
76
-
77
-
78
-
79
-
80
-
81
-
82
-
83
-
84
-
85
-
86
-
87
-
88
-
89
-
90
-
91
-
92
-
93
-
94
-
95
-
96
-
97
-
98
-
99
-
100
-
101
-
102
-
103
-
104
 |
 |
