2012 Yamaha Motorsports Apex X-TX Owners Manual - Page 39
2012 Yamaha Motorsports Apex X-TX Manual

Page 39 highlights
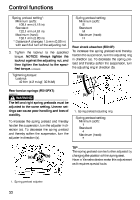
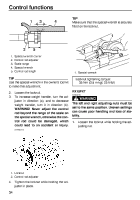
Control functions To increase the rebound damping force, turn the adjusting dial in direction (a). To decrease the rebound damping force, turn the adjusting dial in direction (b). the adjusting knob is continually turned after 12 click(s), there will be no change in the damping force. Be sure to stop the adjusting knob at a position where there is a click. [ECS00910] (b) 1 (a) 1 2 (a) 1. Rear shock absorber damping force remote adjusting dial 2. Standard position (b) 1. Compression damping force adjusting knob Rebound damping setting: Minimum (soft): 11 click(s) in direction (b)* Standard: Adjusting dial aligned with standard position match mark Maximum (hard): 11 click(s) in direction (a)* * With the adjusting dial in the standard position ESU13290 Compression damping force setting: Minimum (soft): 12 click(s) in direction (b)* Standard: 6 click(s) in direction (b)* Maximum (hard): 2 click(s) in direction (b)* * With the adjusting knob fully turned in direction (a) ESU11047 Adjusting the control rods Adjusting the compression damping force of the rear shock absorber (RX10PXT) The compression damping force can be adjusted by turning the adjusting knob. To increase the compression damping force, turn the adjusting knob in direction (a). To decrease the compression damping force, turn the adjusting knob in direction (b). NOTICE: Do not continue to turn the adjusting knob in direction (a) after it stops. The shock absorber could be damaged and damping force adjustments will not be able to be made. Do not turn the adjusting knob in direction (b) more than 12 click(s). Even if The weight transfer can be adjusted by turning the adjuster on the control rod (RX10P / RX10PS) or the adjusting nuts on the control rods (RX10PXT). RX10P / RX10PS 1. Check the control rod length using the scale on the special wrench as shown. TIP In order to obtain a precise measurement, the special wrench corner should touch the control rod adjuster, and the locknut must be turned so that one of its notches aligns with the wrench allowing the wrench to fit horizontally on the control rod. 33
-
 1
1 -
2
-
3
-
4
-
5
-
6
-
7
-
8
-
9
-
10
-
11
-
12
-
13
-
14
-
15
-
16
-
17
-
18
-
19
-
20
-
21
-
22
-
23
-
24
-
25
-
26
-
27
-
28
-
29
-
30
-
31
-
32
-
33
-
 34
34 -
 35
35 -
 36
36 -
 37
37 -
 38
38 -
 39
39 -
 40
40 -
 41
41 -
 42
42 -
 43
43 -
 44
44 -
45
-
46
-
47
-
48
-
49
-
50
-
51
-
52
-
53
-
54
-
55
-
56
-
57
-
58
-
59
-
60
-
61
-
62
-
63
-
64
-
65
-
66
-
67
-
68
-
69
-
70
-
71
-
72
-
73
-
74
-
75
-
76
-
77
-
78
-
79
-
80
-
81
-
82
-
83
-
84
-
85
-
86
-
87
-
88
-
89
-
90
-
91
-
92
-
93
-
94
-
95
-
96
-
97
-
98
-
99
-
100
-
101
-
102
-
103
-
104
-
105
-
106
 |
 |
