2011 Yamaha Motorsports Phazer R-TX Owners Manual - Page 74
2011 Yamaha Motorsports Phazer R-TX Manual

Page 74 highlights
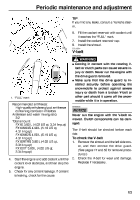
Periodic maintenance and adjustment 2. Check the parking brake pads for wear by measuring the thickness of the pads. If the parking brake pads reach the wear limit, ask a Yamaha dealer to replace them. 1. 2. 3. 4. 5. 1. Parking brake pad wear limit Parking brake pad adjusting bolt locknut Parking brake pad adjusting bolt Parking brake cable locknut Parking brake cable adjusting bolt Parking brake cable length Parking brake pad wear limit: 1.2 mm (0.047 in) 3. Install the right side cover and the shroud. To adjust the parking brake As the parking brake pads wear, adjustment may be necessary to ensure proper brake performance. 1. Remove the shroud and the right side cover. (See page 50 for removal procedures.) 2. Loosen the parking brake pad adjusting bolt locknut and the parking brake pad adjusting bolt. 3. Loosen the parking brake cable locknut. 4. Turn the parking brake cable adjusting bolt in or out to adjust the cable length. Parking brake cable length: 43.5-46.5 mm (1.713-1.831 in) 5. 6. Tighten the parking brake cable locknut. Turn the parking brake pad adjusting bolt in or out to adjust the clearance between the parking brake pads and the brake disc. 4 3 1. 2. 3. 4. Parking brake pad Brake disc Parking brake pad adjusting bolt Parking brake pad adjusting bolt locknut Parking brake pad to brake disc clearance (a) + (b): 1.5-2.0 mm (0.059-0.079 in) 7. Tighten the parking brake pad adjusting bolt locknut. 68
-
 1
1 -
2
-
3
-
4
-
5
-
6
-
7
-
8
-
9
-
10
-
11
-
12
-
13
-
14
-
15
-
16
-
17
-
18
-
19
-
20
-
21
-
22
-
23
-
24
-
25
-
26
-
27
-
28
-
29
-
30
-
31
-
32
-
33
-
34
-
35
-
36
-
37
-
38
-
39
-
40
-
41
-
42
-
43
-
44
-
45
-
46
-
47
-
48
-
49
-
50
-
51
-
52
-
53
-
54
-
55
-
56
-
57
-
58
-
59
-
60
-
61
-
62
-
63
-
64
-
65
-
66
-
67
-
68
-
 69
69 -
 70
70 -
 71
71 -
 72
72 -
 73
73 -
 74
74 -
 75
75 -
 76
76 -
 77
77 -
 78
78 -
 79
79 -
80
-
81
-
82
-
83
-
84
-
85
-
86
-
87
-
88
-
89
-
90
-
91
-
92
-
93
-
94
-
95
-
96
-
97
-
98
-
99
-
100
-
101
-
102
 |
 |
