2011 Yamaha Motorsports Phazer R-TX Owners Manual - Page 70
2011 Yamaha Motorsports Phazer R-TX Manual

Page 70 highlights
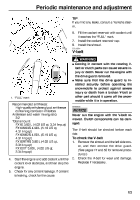
Periodic maintenance and adjustment 3. Rotate the secondary sliding sheave clockwise and push it so that it separates from the secondary fixed sheave. 1. V-belt wear limit New V-belt width: 34.5 mm (1.36 in) V-belt wear limit width: 32.5 mm (1.28 in) 3. Install the drive guard, and then install the left side cover and the shroud. 1. Secondary sliding sheave 2. Secondary fixed sheave 4. Pull the V-belt up over the secondary fixed sheave. To replace and adjust the V-belt EWS00411 WARNING When installing a new V-belt, make sure that it is positioned properly. Otherwise, the V-belt clutch engagement speed will be changed and the snowmobile may move unexpectedly when the engine is started, which could cause an accident. ECS00511 1. V-belt NOTICE As the V-belt wears, the position of the Vbelt will change. If the V-belt position is out of specification, it must be adjusted to ensure proper clutch performance. Have a Yamaha dealer make this adjustment. 1. 2. Place the snowmobile on a level surface and apply the parking brake. Remove the shroud and the left side cover, and then remove the drive guard. (See pages 17 and 50 for removal procedures.) 5. 6. Remove the V-belt from the secondary sheave assembly and primary sheave assembly. Temporarily install the new V-belt on the secondary sheave assembly only, and then measure the V-belt position. Do not force the V-belt between the sheaves; the secondary sliding and fixed sheaves must touch each other. 64
-
 1
1 -
2
-
3
-
4
-
5
-
6
-
7
-
8
-
9
-
10
-
11
-
12
-
13
-
14
-
15
-
16
-
17
-
18
-
19
-
20
-
21
-
22
-
23
-
24
-
25
-
26
-
27
-
28
-
29
-
30
-
31
-
32
-
33
-
34
-
35
-
36
-
37
-
38
-
39
-
40
-
41
-
42
-
43
-
44
-
45
-
46
-
47
-
48
-
49
-
50
-
51
-
52
-
53
-
54
-
55
-
56
-
57
-
58
-
59
-
60
-
61
-
62
-
63
-
64
-
 65
65 -
 66
66 -
 67
67 -
 68
68 -
 69
69 -
 70
70 -
 71
71 -
 72
72 -
 73
73 -
 74
74 -
 75
75 -
76
-
77
-
78
-
79
-
80
-
81
-
82
-
83
-
84
-
85
-
86
-
87
-
88
-
89
-
90
-
91
-
92
-
93
-
94
-
95
-
96
-
97
-
98
-
99
-
100
-
101
-
102
 |
 |
