2008 Yamaha Motorsports V Star 1300 Owners Manual - Page 59
2008 Yamaha Motorsports V Star 1300 Manual

Page 59 highlights
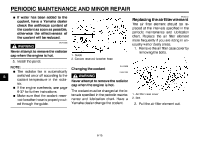
PERIODIC MAINTENANCE AND MINOR REPAIR 3. If the specified clutch lever free play could be obtained as described above, tighten the locknut and skip the rest of the procedure, otherwise, proceed as follows. 4. Fully turn the adjusting bolt in direction (a) to loosen the clutch cable. 5. Loosen the locknut further down the clutch cable. EAU22092 EWA10630 Adjusting the brake lever free play WARNING G G 1 2 (b) 1. Locknut 2. Brake lever free play adjusting screw 3. Brake lever free play (a) 1. Clutch lever free play adjusting nut (clutch cable) 2. Locknut (clutch cable) 6. To increase the clutch lever free play, turn the adjusting nut in direction (a). To decrease the clutch lever free play, turn the adjusting nut in direction (b). 7. Tighten both locknuts. The brake lever free play should measure 2.0-5.0 mm (0.08-0.20 in) as shown. Periodically check the brake lever free play and, if necessary, adjust it as follows. 1. Loosen the locknut at the brake lever. 2. To increase the brake lever free play, turn the adjusting screw in direction (a). To decrease the brake lever free play, turn the adjusting screw in direction (b). 3. Tighten the locknut. 6-20 After adjusting the brake lever free play, check the free play and make sure that the brake is working properly. A soft or spongy feeling in the brake lever can indicate the presence of air in the hydraulic system. If there is air in the hydraulic system, have a Yamaha dealer bleed the system before operating the motorcycle. Air in the hydraulic system will diminish the braking performance, which may result in loss of control and an accident. 6
-
 1
1 -
2
-
3
-
4
-
5
-
6
-
7
-
8
-
9
-
10
-
11
-
12
-
13
-
14
-
15
-
16
-
17
-
18
-
19
-
20
-
21
-
22
-
23
-
24
-
25
-
26
-
27
-
28
-
29
-
30
-
31
-
32
-
33
-
34
-
35
-
36
-
37
-
38
-
39
-
40
-
41
-
42
-
43
-
44
-
45
-
46
-
47
-
48
-
49
-
50
-
51
-
52
-
53
-
 54
54 -
 55
55 -
 56
56 -
 57
57 -
 58
58 -
 59
59 -
 60
60 -
 61
61 -
 62
62 -
 63
63 -
 64
64 -
65
-
66
-
67
-
68
-
69
-
70
-
71
-
72
-
73
-
74
-
75
-
76
-
77
-
78
-
79
-
80
-
81
-
82
-
83
-
84
-
85
-
86
-
87
-
88
-
89
-
90
-
91
-
92
-
93
-
94
-
95
-
96
-
97
-
98
 |
 |
