2007 Yamaha Motorsports Grizzly 350 Owners Manual - Page 118
2007 Yamaha Motorsports Grizzly 350 Manual

Page 118 highlights
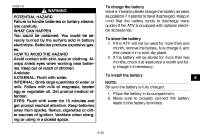
2. Turn the adjusting nut while holding the brake light switch in place. To make the brake light come on earlier, turn the adjusting nut in direction (a). To make the brake light come on later, turn the adjusting nut in direction (b). essary. If a cable is damaged or does not move smoothly, have a Yamaha dealer check or replace it. Recommended lubricant: Engine oil EWB02120 WARNING POTENTIAL HAZARD Damaged control cables. WHAT CAN HAPPEN Corrosion can result when the cable sheaths become damaged, and cables can also become frayed or kinked, which could restrict the operation of controls and lead to an accident or injury. HOW TO AVOID THE HAZARD Inspect cables frequently. Replace damaged cables. EBU24911 8 1. Brake light switch 2. Brake light switch adjusting nut 3. Install the panel. EBU24890 Checking and lubricating the cables The operation and the condition of all control cables should be checked before each ride, and the cables and cable ends should be lubricated if nec- Checking and lubricating the front and rear brake levers The operation of the front and rear brake levers should be checked before each ride, and the lever pivots should be lubricated if necessary. 8-32
-
 1
1 -
2
-
3
-
4
-
5
-
6
-
7
-
8
-
9
-
10
-
11
-
12
-
13
-
14
-
15
-
16
-
17
-
18
-
19
-
20
-
21
-
22
-
23
-
24
-
25
-
26
-
27
-
28
-
29
-
30
-
31
-
32
-
33
-
34
-
35
-
36
-
37
-
38
-
39
-
40
-
41
-
42
-
43
-
44
-
45
-
46
-
47
-
48
-
49
-
50
-
51
-
52
-
53
-
54
-
55
-
56
-
57
-
58
-
59
-
60
-
61
-
62
-
63
-
64
-
65
-
66
-
67
-
68
-
69
-
70
-
71
-
72
-
73
-
74
-
75
-
76
-
77
-
78
-
79
-
80
-
81
-
82
-
83
-
84
-
85
-
86
-
87
-
88
-
89
-
90
-
91
-
92
-
93
-
94
-
95
-
96
-
97
-
98
-
99
-
100
-
101
-
102
-
103
-
104
-
105
-
106
-
107
-
108
-
109
-
110
-
111
-
112
-
 113
113 -
 114
114 -
 115
115 -
 116
116 -
 117
117 -
 118
118 -
 119
119 -
 120
120 -
 121
121 -
 122
122 -
 123
123 -
124
-
125
-
126
-
127
-
128
-
129
-
130
-
131
-
132
-
133
-
134
-
135
-
136
-
137
-
138
-
139
-
140
-
141
-
142
-
143
-
144
-
145
-
146
-
147
-
148
-
149
-
150
-
151
 |
 |
