2005 Yamaha Motorsports Royal Star Venture Owners Manual - Page 21
2005 Yamaha Motorsports Royal Star Venture Manual

Page 21 highlights
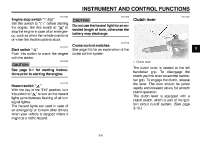
INSTRUMENT AND CONTROL FUNCTIONS EAU36400 Speedometer unit G G a clock a fuel meter 1. Speedometer 2. Odometer/tripmeter/fuel reserve tripmeter/clock 3. "RESET" button 4. "SELECT" button 5. Fuel meter The speedometer unit is equipped with the following: G a digital speedometer (which shows riding speed) G an odometer (which shows the total distance traveled) G two tripmeters (which show the distance traveled since they were last set to zero) G a fuel reserve tripmeter (which shows the distance traveled on the fuel reserve) Odometer and tripmeter modes Pushing the "SELECT" button switches the display between the odometer mode "ODO" and the tripmeter modes "TRIP 1" and "TRIP 2" in the following order: ODO → TRIP 1 → TRIP 2 → ODO If the fuel level warning light comes on (see page 3-2), the odometer display will automatically change to the fuel reserve tripmeter mode "TRIP F" and start counting the distance traveled from that point. In that case, pushing the "SELECT" button switches the display between the various tripmeter and odometer modes in the following order: TRIP F → TRIP 1 → TRIP 2 → ODO → TRIP F To reset a tripmeter, select it by pushing the "SELECT" button, and then push the "RESET" button. If you do not reset the fuel reserve tripmeter manually, it will reset itself automatically and the display will return to "TRIP 1" after refueling and traveling 5 km (3 mi). 3-4 NOTE: After resetting the fuel reserve tripmeter, the display will return to the prior mode. Clock mode To change the display to the clock mode, push the "SELECT" button for at least two seconds. To change the display back to the odometer and tripmeter modes, push the "SELECT" button. To set the clock: 1. Push both the "SELECT" and "RESET" buttons for at least two seconds. 2. When the hour digits start flashing, push the "RESET" button to set the hours. 3. Push the "SELECT" button, and the minute digits will start flashing. 4. Push the "RESET" button to set the minutes. 5. Push the "SELECT" button to start the clock. 3
-
 1
1 -
2
-
3
-
4
-
5
-
6
-
7
-
8
-
9
-
10
-
11
-
12
-
13
-
14
-
15
-
 16
16 -
 17
17 -
 18
18 -
 19
19 -
 20
20 -
 21
21 -
 22
22 -
 23
23 -
 24
24 -
 25
25 -
 26
26 -
27
-
28
-
29
-
30
-
31
-
32
-
33
-
34
-
35
-
36
-
37
-
38
-
39
-
40
-
41
-
42
-
43
-
44
-
45
-
46
-
47
-
48
-
49
-
50
-
51
-
52
-
53
-
54
-
55
-
56
-
57
-
58
-
59
-
60
-
61
-
62
-
63
-
64
-
65
-
66
-
67
-
68
-
69
-
70
-
71
-
72
-
73
-
74
-
75
-
76
-
77
-
78
-
79
-
80
-
81
-
82
-
83
-
84
-
85
-
86
-
87
-
88
-
89
-
90
-
91
-
92
-
93
-
94
-
95
-
96
-
97
-
98
-
99
-
100
-
101
-
102
-
103
-
104
-
105
-
106
-
107
-
108
-
109
-
110
-
111
-
112
-
113
-
114
-
115
-
116
-
117
-
118
-
119
-
120
-
121
-
122
-
123
 |
 |
