2005 Yamaha Motorsports Bruin 250 Owners Manual - Page 138
2005 Yamaha Motorsports Bruin 250 Manual

Page 138 highlights
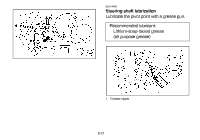
EBU15470 Clutch adjustment 1. Remove the footboard. (See page 8-8.) 2. Loosen the locknut. 3. Slowly turn the adjusting bolt counterclockwise until resistance is felt. Then, turn it 1/8 turn clockwise. NOTE: Turn the adjusting bolt counterclockwise to decrease the clutch free play and turn it clockwise to increase the free play. _ _ 5. Install the footboard. EBU00356 Cable inspection and lubrication WARNING POTENTIAL HAZARD Damaged control cables. WHAT CAN HAPPEN Corrosion can result when the outer covering of control cables becomes damaged. Cables can also become frayed or kinked. Operation of controls could be restricted, which could cause an accident or injury. HOW TO AVOID THE HAZARD Inspect cables frequently. Replace damaged cables. 8-35 1. Locknut 2. Adjusting bolt 4. Tighten the locknut to specification. Tightening torque: 15 Nm (1.5 m·kgf, 11 ft·lbf)
-
 1
1 -
2
-
3
-
4
-
5
-
6
-
7
-
8
-
9
-
10
-
11
-
12
-
13
-
14
-
15
-
16
-
17
-
18
-
19
-
20
-
21
-
22
-
23
-
24
-
25
-
26
-
27
-
28
-
29
-
30
-
31
-
32
-
33
-
34
-
35
-
36
-
37
-
38
-
39
-
40
-
41
-
42
-
43
-
44
-
45
-
46
-
47
-
48
-
49
-
50
-
51
-
52
-
53
-
54
-
55
-
56
-
57
-
58
-
59
-
60
-
61
-
62
-
63
-
64
-
65
-
66
-
67
-
68
-
69
-
70
-
71
-
72
-
73
-
74
-
75
-
76
-
77
-
78
-
79
-
80
-
81
-
82
-
83
-
84
-
85
-
86
-
87
-
88
-
89
-
90
-
91
-
92
-
93
-
94
-
95
-
96
-
97
-
98
-
99
-
100
-
101
-
102
-
103
-
104
-
105
-
106
-
107
-
108
-
109
-
110
-
111
-
112
-
113
-
114
-
115
-
116
-
117
-
118
-
119
-
120
-
121
-
122
-
123
-
124
-
125
-
126
-
127
-
128
-
129
-
130
-
131
-
132
-
 133
133 -
 134
134 -
 135
135 -
 136
136 -
 137
137 -
 138
138 -
 139
139 -
 140
140 -
 141
141 -
 142
142 -
 143
143 -
144
-
145
-
146
-
147
-
148
-
149
-
150
-
151
-
152
-
153
-
154
-
155
-
156
-
157
-
158
-
159
-
160
-
161
-
162
-
163
-
164
-
165
-
166
-
167
-
168
-
169
-
170
-
171
-
172
-
173
-
174
 |
 |
