2004 Yamaha Motorsports Royal Star Venture Owners Manual - Page 75
2004 Yamaha Motorsports Royal Star Venture Manual

Page 75 highlights
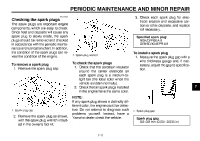
PERIODIC MAINTENANCE AND MINOR REPAIR 2. Remove the screws, and then pull the cowling off as shown. NOTE: Make sure that the projection fits into the grommet. 2. Install cowling A. EAU19292 Panels A and B To remove one of the panels Remove the screw, and then pull the panel off as shown. 1. Cowling B 2. Screw 1. Grommet 2. Projection 3. Cowling A NOTE: G Make sure that the projection fits into the grommet. G To install the quick fastener, push the center pin out so that it will protrude from the fastener head, insert the fastener into the cowling, and then push the protruding pin in until it is flush with the fastener head. EAU18950 To install the cowling 1. Place the cowling in the original position, and then install the screws. 7 1. Panel A 2. Screw Cowling B To remove the cowling 1. Remove cowling A. 1. Screw 7-9
-
 1
1 -
2
-
3
-
4
-
5
-
6
-
7
-
8
-
9
-
10
-
11
-
12
-
13
-
14
-
15
-
16
-
17
-
18
-
19
-
20
-
21
-
22
-
23
-
24
-
25
-
26
-
27
-
28
-
29
-
30
-
31
-
32
-
33
-
34
-
35
-
36
-
37
-
38
-
39
-
40
-
41
-
42
-
43
-
44
-
45
-
46
-
47
-
48
-
49
-
50
-
51
-
52
-
53
-
54
-
55
-
56
-
57
-
58
-
59
-
60
-
61
-
62
-
63
-
64
-
65
-
66
-
67
-
68
-
69
-
 70
70 -
 71
71 -
 72
72 -
 73
73 -
 74
74 -
 75
75 -
 76
76 -
 77
77 -
 78
78 -
 79
79 -
 80
80 -
81
-
82
-
83
-
84
-
85
-
86
-
87
-
88
-
89
-
90
-
91
-
92
-
93
-
94
-
95
-
96
-
97
-
98
-
99
-
100
-
101
-
102
-
103
-
104
-
105
-
106
-
107
-
108
-
109
-
110
-
111
-
112
-
113
-
114
-
115
-
116
-
117
-
118
-
119
-
120
-
121
 |
 |
