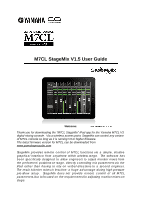
Yamaha M7CL M7cl Stagemix V1.5 User Guide - Page 4
Getting Started - users guide
 |
View all Yamaha M7CL manuals
Add to My Manuals
Save this manual to your list of manuals |
Page 4 highlights
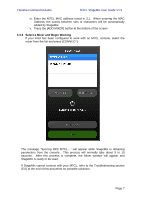
Yamaha Commercial Audio M7CL StageMix User Guide V1.5 3.0 Getting Started 3.1 M7CL Network Setup I. Connect the WiFi access point to the M7CL's network port via a CAT5 cable. Note that a cross-over cable will be needed with older access points that don't have the "auto MDIX" function. Most recent devices will support "auto MDIX", in which case a straight CAT5 cable can be used. II. Note the IP address and MAC address of the M7CL - they will need to be entered into the iPad later. They can be found in the console as follows: a. Press SETUP on the M7CL touchscreen b. Press [NETWORK] on the M7CL touchscreen 3.2 iPad WiFi Settings The iPad needs to be given a static IP address in the same range as the M7CL's IP Address. a. Open the iPad "Settings" menu b. Select "WiFi", and choose the correct network (with the SSID and password given in step 2 above). Page 4
-
 1
1 -
 2
2 -
 3
3 -
 4
4 -
 5
5 -
 6
6 -
 7
7 -
 8
8 -
 9
9 -
 10
10 -
11
-
12
-
13
-
14
-
15
-
16
-
17
-
18
-
19
-
20
 |
 |
