Yamaha HTR-6030 Owner's Manual - Page 54
OPTION MENU, Display settings, Memory guard, Audio select, Parameter initialization
 |
View all Yamaha HTR-6030 manuals
Add to My Manuals
Save this manual to your list of manuals |
Page 54 highlights
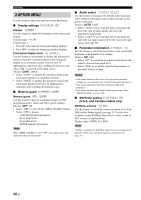
Set menu 3 OPTION MENU Use this menu to adjust the optional system parameters. ■ Display settings A)DISPLAY SET Dimmer DIMMER Use this feature to adjust the brightness of the front panel display. Control range: -4 to 0 Control step: 1 • Press Gl to make the front panel display dimmer. • Press Gh to make the front panel display brighter. Front panel display scroll FL SCROLL Use this feature to set whether to display the information (such as song title or channel name) in the front panel display in a continuous manner or by the first 14 alphanumeric characters after scrolling all characters once when "XM" is selected as the input source. Choices: CONT, ONCE • Select "CONT" to display the operation status in the front panel display in a continuous manner. • Select "ONCE" to display the operation status in the front panel display by the first 14 alphanumeric characters after scrolling all characters once. ■ Memory guard B)MEMORY GUARD Memory guard MEM. GUARD Use this feature to prevent accidental changes to DSP program parameter values and other system settings. Choices: OFF, ON • Select "OFF" to turn off the "MEM. GUARD" feature. • Select "ON" to protect: - sound field program parameters - all set menu items - all speaker levels - SCENE template parameters Note When "MEM. GUARD" is set to "ON", you cannot select and adjust any other set menu items. ■ Audio select C)AUDIO SELECT Use this feature to designate the default audio input jack select setting for the input sources when you turn on the power of this unit. Choices: AUTO, LAST • Select "AUTO" if you want this unit to automatically detect the type of input signals and select the appropriate input mode. • Select "LAST" if you want this unit to automatically select the last input mode used for the connected input source (see page 29). ■ Parameter initialization D)PARAM. INI Use this feature to set all the parameters of the sound field programs to the initial factory settings. Choices: NO, YES • Select "NO" to cancel the parameter initialization and return to the previous menu level. • Select "YES" to set all the sound field parameters to the initial factory settings. Notes • You cannot automatically revert to the previous parameter settings once you initialize the sound field program parameters. • You cannot separately initialize individual sound field programs. • You cannot initialize any sound field program groups when "MEM. GUARD" is set to "ON". ■ XM Radio setting E)XM RADIO SET (U.S.A. and Canada models only) XM Radio antenna XM ANT. Use this feature to check the current reception level of the XM Satellite Radio signals (see page 37). For the best reception, orient XM Mini-Tuner Dock so that a value of 60% or more is displayed here. Display status: NONE, 0 to 100% Note "NONE" is displayed if XM Mini-Tuner Dock is not connected to this unit. In this case, check the antenna connections (see page 37). 50 En
-
 1
1 -
2
-
3
-
4
-
5
-
6
-
7
-
8
-
9
-
10
-
11
-
12
-
13
-
14
-
15
-
16
-
17
-
18
-
19
-
20
-
21
-
22
-
23
-
24
-
25
-
26
-
27
-
28
-
29
-
30
-
31
-
32
-
33
-
34
-
35
-
36
-
37
-
38
-
39
-
40
-
41
-
42
-
43
-
44
-
45
-
46
-
47
-
48
-
 49
49 -
 50
50 -
 51
51 -
 52
52 -
 53
53 -
 54
54 -
 55
55 -
 56
56 -
 57
57 -
 58
58 -
 59
59 -
60
-
61
-
62
-
63
-
64
-
65
-
66
-
67
-
68
-
69
-
70
-
71
-
72
-
73
-
74
-
75
-
76
-
77
-
78
 |
 |
