Vtech ev2653 User Manual - Page 24
Answering System Operation
 |
View all Vtech ev2653 manuals
Add to My Manuals
Save this manual to your list of manuals |
Page 24 highlights
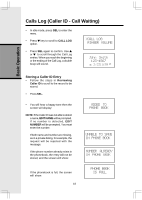
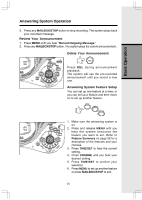
Basic Operation Answering System Operation Audible Indicators This system gives you voice prompts for feature operations and voice confirmations when you press a button or complete an operation. Turn Answering System On or Off Press ANSWER ON/OFF to turn the system on or off. When the system is turned on, you will hear "Answering machine on" and the ANSWER ON/OFF light will be lit. When the system is off, you will hear "Answering machine off" and the ON/OFF light will not be lit. The system will still answer after 10 rings if it is off, then announce "Please enter your security code" and wait for you to enter your two-digit code to access remote functions. (See Remote Access on page 31 for details.) Set The Clock This system comes preset to Monday, 12:00 AM, 2003. If CL flashes in the message window, you will need to set the correct day and time at the Base. NOTE: The day and time will automatically be set when you receive your first Caller ID record if you have not already manually set it. 1. Press TIME/SET. The day, time and year will be announced, followed by "To set day and time, press TIME/SET." Press TIME/SET again. The day will be announced. 2. Press CHANGE until the system announces the correct day, then press TIME/SET. The system announces the current hour setting. 3. Press CHANGE until the system announces the correct hour, press TIME/SET. The system announces the current minute setting. 4. Press CHANGE to advance the minutes one at a time. - OR - Press and hold CHANGE to advance the minutes in increments of 10. When the system announces the correct minute, press TIME/SET. The system announces the current clock setting. NOTE: Press any MAILBOX/STOP button to exit programming at any time. The MAILBOX/STOP buttons are located on the Base Unit and are labled numbers 1, 2, and 3. These buttons also playback messages left in their respective mailbox. 23
-
 1
1 -
2
-
3
-
4
-
5
-
6
-
7
-
8
-
9
-
10
-
11
-
12
-
13
-
14
-
15
-
16
-
17
-
18
-
 19
19 -
 20
20 -
 21
21 -
 22
22 -
 23
23 -
 24
24 -
 25
25 -
 26
26 -
 27
27 -
 28
28 -
 29
29 -
30
-
31
-
32
-
33
-
34
-
35
-
36
-
37
-
38
-
39
-
40
-
41
-
42
-
43
-
44
-
45
 |
 |
