Vtech 914-916adl User Manual - Page 9
Getting Started
 |
View all Vtech 914-916adl manuals
Add to My Manuals
Save this manual to your list of manuals |
Page 9 highlights
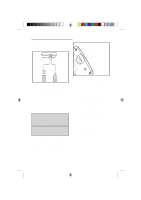
GETTING STARTED Setting Up Your VTECH 914 ADLi 1. Choose an area near an electrical outlet and a telephone wall jack. 9V DC TEL.LINE SETTING UP YOUR VTECH 914ADLi PULSE TONE TONE PULSE SELECTION AC ELECTRICAL OUTLET TELEPHONE WALL JACK 2. Connect the telephone line cord. Insert one end of the telephone line cord into the jack at the rear of the base unit. Plug the other end into a telephone wall jack. Make sure the plugs snap securely into place. 3. Plug the AC power adapter into an electrical outlet and the DC connector to the back of the base unit. CAUTION: Use only the AC adapter shipped with your 914 ADLi. This is a Class 2 AC adapter, specifically designed for use with the 914 ADLi. NOTE: Connect power to the base unit before placing the handset in the cradle. 4. The FULL and ON LED will flash to indicate the ITAD needs to be initialized. After a while, only the MEM FULL/SET CLOCK LED flashes, indicating that the day and time must be set. 5. Set the TONE/PULSE switch on the base unit. If you have touch tone service on your phone line, set the switch to TONE. If you have rotary service, set the switch to PULSE. 6. C H A R G E T H E H A N D S E T BATTERIES BEFORE USE. The batteries recharge automatically whenever the handset is in the base unit cradle. The batteries must be charged for 24 hours before using your phone for the first time. After the initial charge, a maintenance charge of 8 hours is sufficient to return a low battery to full condition. 7. CHECK FOR A DIAL TONE. After the batteries are charged, pick up the handset and press the PHONE key. The PHONE indicator should light up, and you should hear a dial tone. If not, see IN CASE OF DIFFICULTY. 9
-
 1
1 -
2
-
3
-
 4
4 -
 5
5 -
 6
6 -
 7
7 -
 8
8 -
 9
9 -
 10
10 -
 11
11 -
 12
12 -
 13
13 -
 14
14 -
15
-
16
-
17
-
18
-
19
-
20
-
21
-
22
-
23
-
24
-
25
-
26
-
27
-
28
-
29
-
30
-
31
-
32
-
33
-
34
-
35
-
36
-
37
-
38
-
39
-
40
-
41
-
42
-
43
 |
 |
