Viper 3002 Owner Manual
Viper 3002 Manual
 |
View all Viper 3002 manuals
Add to My Manuals
Save this manual to your list of manuals |
Viper 3002 manual content summary:
- Viper 3002 | Owner Manual - Page 1
Model 3002 ➤Owner's Guide - Viper 3002 | Owner Manual - Page 2
the siren, the remote transmitters, the associated sensors and accessories, which proves to be defective in workmanship or material under reasonable use during the lifetime of the vehicle provided the following conditions are met: the unit was professionally installed and serviced by an authorized - Viper 3002 | Owner Manual - Page 3
OFFER A LIMITED WARRANTY TO REPLACE OR REPAIR THE CONTROL MODULE Service at 1-800876-0800. Directed security systems alarm installed ➤ Year, make, model and color of the automobile ➤ Automobile license number ➤ Vehicle identification number ➤ All security options installed on automobile ➤ Installation - Viper 3002 | Owner Manual - Page 4
11 replacement remote controls 11 2-way remote control functions 12 standard configuration 12 remote operation 15 system signal paging features 15 out of range notification 16 programming 2-way remote 17 using your system 18 active arming 18 passive arming 19 multi-level security arming - Viper 3002 | Owner Manual - Page 5
37 power saver mode 38 programming 39 installation options 42 vehicle recovery system (vrs 42 arming the vrs 43 vrs® triggered sequence 44 disarming the vrs 45 programming options 46 security & convenience expansions 48 glossary of terms 51 quick reference guide 53 6 © 2006 directed - Viper 3002 | Owner Manual - Page 6
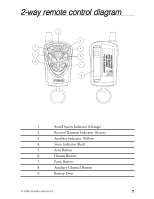
2-way remote control diagram 2 3 1 4 5 6 8 7 9 1-800-274-0200 RPN 488V/P/X 2(66) CODES FCC ID: EZSDEI487 1. Arm/Disarm Indicator (Orange) 2. Receive/Transmit Indicator (Green) 3. Auxiliary Indicator (Yellow) 4. Siren Indicator (Red) 5. Arm - Viper 3002 | Owner Manual - Page 7
standard remote configurations controls the Lock-Arm/Panic On/Panic Off function. controls the Unlock-Disarm/Panic Off function. controls Silent Mode™ and an Auxiliary Output (2). controls - Viper 3002 | Owner Manual - Page 8
on the purchase of your state-of-the-art vehicle security system. This system has been designed to provide years of trouble-free operation. Due to the complexity of this system, it must be installed by an authorized dealer only. Installation of this product by anyone other than an authorized dealer - Viper 3002 | Owner Manual - Page 9
system needs no specific maintenance beyond 2-way remote control battery replacement. The 2-way remote is powered by a 1.5V AAA battery. The 1-way remote is powered by a pair of 3V CR2016 batteries. Low Battery Notification If the battery is low (and this feature is programmed On) the 2way remote - Viper 3002 | Owner Manual - Page 10
to operate this device. replacement remote controls You can purchase replacement remote controls from your Authorized Dealer or on-line at the following web site: www.directedstore.com Once you receive your new remote control, please refer to instructions included on the remote packaging. © 2006 - Viper 3002 | Owner Manual - Page 11
2-way remote control functions The 2-way remote control buttons are used to send commands to the system. The descriptions below reflect the standard configuration for this system. The buttons can be custom configured for the user's specific needs by the installer. ➜ standard configuration Button - Viper 3002 | Owner Manual - Page 12
simultaneously. The auxiliary output controls and Buttons An optional auxiliary convenience or expansion function that you have added to your system can be activated by pressing these buttons simultaneously. The auxiliary output controls and Buttons An optional auxiliary convenience or expansion - Viper 3002 | Owner Manual - Page 13
to assign any transmitter button to any system function. The transmitter initially comes programmed with Standard Configuration, but may also be customized by an authorized dealer. The buttons in all of the instructions in this manual correspond to a Standard Configuration transmitter. 14 © 2006 - Viper 3002 | Owner Manual - Page 14
to confirm receipt. Alarm Page If the alarm system is triggered while armed, an Alarm Page will be sent to the remote control. When the remote receives an Alarm Page, the LED icons will display the alarm system status information and the remote control will generate beeps. An Alarm Page alert is - Viper 3002 | Owner Manual - Page 15
sensor or optional sensor has triggered the alarm the remote will display the alarm page with 6 Red LED flashes and 10 rapid beeps. If the trunk, door, ignition, or hood triggered the alarm the remote will display the alarm page with the Red LED illuminating for 3-seconds and 4 rapid beeps (repeated - Viper 3002 | Owner Manual - Page 16
beeps Off. The notification beeps are programmed On from the factory and can be programmed Off if they are not desired. When programmed Off the remote will only flash the LEDs as notification of a command page or an alarm page. 2-Way LED Remote battery low notification Press to select low - Viper 3002 | Owner Manual - Page 17
(Armed/Disarmed) will be notified to the remote. To exit programming mode The 2-way LED remote control will exit programming mode after 2-seconds of inactivity and will emit 2 long beeps. using your system The buttons described in this manual correspond to the standard configuration. Remember, this - Viper 3002 | Owner Manual - Page 18
be checked. If after 2-seconds the remote beeps once, the Orange LED flashes 6-times and the Red LED lights for 3-seconds, the system has detected an open door, hood or trunk and has been bypassed. ➜ passive arming The system can be programmed to arm itself automatically (called passive arming - Viper 3002 | Owner Manual - Page 19
. ➤ If a door is opened, the system will immediately start chirping the siren and flashing the parking lights. Three seconds later, the siren output changes to a continuous blast. This progressive response gives you time to disarm the system with your 2-way remote if you inadvertently open the door - Viper 3002 | Owner Manual - Page 20
(See the Table of Zones section of this guide.) Pressing again within five seconds of arming the security system will activate the MultiLevel Security Arming feature. Each time is pressed again, a different security level is selected. The different security levels can be selected as follows: ➤ Press - Viper 3002 | Owner Manual - Page 21
of the to reach the next level of security, the remote will emit normal arm notification (1 beep and 3 flashes of the Orange LED). For easiest operation in reaching each level of security, press immediately after each notification. ➜ disarming To disarm the system, press . You will hear two chirps - Viper 3002 | Owner Manual - Page 22
Valet Button Number of Pulses important! The unit can be programmed to respond to one to five pulses of the Valet button for the disarm function. Be sure to check with the installer for the desired programming. The 2-way remote will indicate disarm notification with 2 beeps and 3 flashes of the - Viper 3002 | Owner Manual - Page 23
light activates for 30-seconds after the system sees a door has closed. (If door was held open for longer than 3 minutes the dome light will not illuminate.) full The dome light activates for 30-seconds after seeing door closure, ignition, or security disarm. (This is the factory setting.) ➜ silent - Viper 3002 | Owner Manual - Page 24
system with your 2-way remote. Just press or button for approximately two seconds, and you will enter Panic Mode. The siren will sound and the parking lights will flash for the programmed siren duration. To stop Panic Mode at any time, press or button on the 2-way remote again. The 2-way LED remote - Viper 3002 | Owner Manual - Page 25
the vehicle or having it serviced. In Valet Mode, the security system will not arm, even with the remote transmitter, but all convenience you are exiting Valet Mode. The remote will respond with 3 Orange LED flashes on entering and 2 beeps and 3 Orange LED flashes on exiting Valet® Mode. To - Viper 3002 | Owner Manual - Page 26
LED will light solidly if you are entering Valet® Mode, and it will go out if you are exiting Valet® Mode. The remote responds with the normal arm notifications with each remote button press. ➜ one-time bypass This feature stops the alarm from arming or activating any outputs that are programmed - Viper 3002 | Owner Manual - Page 27
ceases. note: Arming and disarming the system does not reset this function.The only ways to reset a bypassed zone are for it to not trigger for 60 minutes, or to turn on the ignition. If testing your system, it is important to remember that the NPC® programming can cause zones to be bypassed and - Viper 3002 | Owner Manual - Page 28
activate this output to control an additional convenience option. The remote will respond with a page notification consisting of an output tone (once) and the Yellow LED will flash 3-times. This occurs at the remote after the system has received the command to activate any of the Auxiliary outputs - Viper 3002 | Owner Manual - Page 29
buttons for 6-seconds. 2. The system will emit 1 long chirp to indicate entry into shock adjustment mode. 3. The LED will illuminate continuously for the duration of and then 1 long chirp. note: When the arm and disarm are programmed to a single button, then the AUX button is used to increase the - Viper 3002 | Owner Manual - Page 30
the heel of the palm of your hand to strike the door pillar of the car after an adjustment. The siren will chirp once if the impact was great enough Valet button is pressed. The siren will emit 1 long chirp and the LED will extinguish which shock adjustment mode is exited. ➜ reset shock sensor to - Viper 3002 | Owner Manual - Page 31
not occur when using Silent Mode™ or if chirps have been programmed OFF. The security system will ignore the input that was active when the system was armed, until the input goes away. Three seconds later the system will monitor that input normally. For example, 32 © 2006 directed electronics - Viper 3002 | Owner Manual - Page 32
triggered so many times that Nuisance Prevention® Circuitry has bypassed that zone. The in-vehicle status LED will indicate which zone was involved. (See Table of Zones section of this guide.) The system will retain this information in its memory, and continue to chirp four or five times each time - Viper 3002 | Owner Manual - Page 33
Action Arm Arm Disarm Disarm Disarm Number of Chirps 1 1 (3-second delay), 1 2 4 5 Description System armed System armed with Bypass Notification System disarmed System disarmed with Tamper Alert System disarmed NPC® active 34 © 2006 directed electronics - Viper 3002 | Owner Manual - Page 34
flashes used by the system to identify that input. The standard input assignments are listed below, along with spaces to write in any optional sensors or switches you have had installed. Zone - Number of LED Flashes 1 2 3 4 5 6 7 Description Dealer-Installed Options Instant trigger - often used - Viper 3002 | Owner Manual - Page 35
Your system stores the last six triggered zones in memory. If your system has been triggered but the LED has This technology has been developed to increase the security of the unit. The control unit knows with the control unit even if you use the remote control out of range of the vehicle. However, - Viper 3002 | Owner Manual - Page 36
Owner Recognition lets up to four users of the system have different settings that meet their specific needs. It is almost like having four separate alarms in your vehicle, one for each user. note: Owner Recognition cannot be programmed without a Directed Bitwriter® and the necessary software. Check - Viper 3002 | Owner Manual - Page 37
servicing the car, when the battery is reconnected the unit will still be in Valet Mode. This applies to all states of the system including arm, disarm, VRS®, and Valet Mode. power saver mode Your system system is in Valet® Mode, the LED will shut off. If the system remains in Valet® Mode, the LED - Viper 3002 | Owner Manual - Page 38
, and the doors are closed, and unlock when the ignition is turned off. The system will not lock the doors when the ignition is turned on with any door open. If your installer is programming the security system with the Directed Bitwriter, ignition lock and unlock are independent features and can be - Viper 3002 | Owner Manual - Page 39
starter of the vehicle will be disabled. To start the car, it will be necessary to disarm the system with the remote. It is also possible to disarm the AED feature by turning the ignition key to the RUN position and pressing the Valet® button the programmed number of times. AED is disabled when the - Viper 3002 | Owner Manual - Page 40
a nuisance. If your installer is programming the security system with the Directed Bitwriter, the full triggered response can be programmed for any duration ranging from 1 to 180 seconds. ➤ Nuisance Prevention® Circuitry on or off: Please refer to the NPC® section of this manual for a complete - Viper 3002 | Owner Manual - Page 41
full alarm blast. installation options The system has many guide for a complete explanation of how the Vehicle Recovery System operates. vehicle recovery system (vrs®) The optional VRS® feature is designed to ensure that any unauthorized user of your vehicle (even if using your keys and remote - Viper 3002 | Owner Manual - Page 42
security system, system is designed to perform starter interrupt, or starter kill. The Failsafe® Starter Kill cannot shut down an already-running engine - it can only prevent an engine from starting in the first place. important! Any installation arm button on the remote transmitter for one second. - Viper 3002 | Owner Manual - Page 43
next time you or anyone drives the vehicle. This helps to protect the vehicle if someone takes your keys and remote transmitter by force in a parking lot. note: If the VRS® system is armed while operating the vehicle and not disarmed prior to leaving the vehicle, it is still armed and will - Viper 3002 | Owner Manual - Page 44
active until the system is disarmed. If the door is opened or the ignition is turned off and on in an attempt to restart the car, the siren it with one of the following procedures: If the system has not entered the triggered sequence (siren has not started chirping): 1. Turn the ignition on. 2. Press - Viper 3002 | Owner Manual - Page 45
locking the vehicle. Dual Sensor Trigger: If programmed both the onboard and at least one of the optional sensors need to be triggered within 1second of each other for full alarm. note: In dual sensor mode, if one sensor is triggered the LED 2-way remote will report showing the siren icon but the - Viper 3002 | Owner Manual - Page 46
will illuminate for 30-seconds after disarming the system or turning the ignition off. Remote Start Reporting: This channel 3 program option allows bypass of the security inputs that would trigger an alarm when activating an added optional remote start system, but still retains a high level of - Viper 3002 | Owner Manual - Page 47
Disturbance Sensor: An invisible dome of coverage is established by installing the 508D "radar" sensor. Your security system can then react to any intrusions into this field with the triggered sequence. Garage Door: Remote control of your system can go beyond your vehicle. You can also control your - Viper 3002 | Owner Manual - Page 48
remote a programmed time. Power Trunk Release: The channel two output of the system can system to protect your car when its parked. It can protect your vehicle from being lifted to protect your expensive rims. Valet Start System: For the ultimate in convenience, the Valet start system can start - Viper 3002 | Owner Manual - Page 49
Ultrasonic Sensor: Providing a field of protection inside your car using the 509U Ultrasonic sensor to protect your belongings. 50 © 2006 directed electronics - Viper 3002 | Owner Manual - Page 50
security system which prevents the vehicle's starter from cranking whenever the system is armed. The vehicle is never prevented from cranking when the system is disarmed, in Valet mode, or should the starter interrupt switch itself fail. Your system is ready for this feature, however installation - Viper 3002 | Owner Manual - Page 51
Hand-held, remote control which operates the various functions of your system. Trigger or Triggered Sequence: This is what happens when the alarm "goes off" or "trips". The triggered response of your system consists of the siren sounding and parking light flashing for the programmed duration. Valet - Viper 3002 | Owner Manual - Page 52
and then once more to indicate that the ignition is on. Disarming without a 2-way remote ➤ Turn on the ignition. Press and release the Valet® button the programmed number of times within 15 seconds. After five seconds, the system will disarm. If it does not, you may have waited too long. Turn the - Viper 3002 | Owner Manual - Page 53
with the finest vehicle security and car stereo products and accessories available. The recipient of more than 20 patents in the field of advanced electronic technology, Directed is ISO 9001 registered. Quality Directed Electronics products are sold and serviced throughout North America and
-
 1
1 -
 2
2 -
 3
3 -
 4
4 -
 5
5 -
 6
6 -
 7
7 -
8
-
9
-
10
-
11
-
12
-
13
-
14
-
15
-
16
-
17
-
18
-
19
-
20
-
21
-
22
-
23
-
24
-
25
-
26
-
27
-
28
-
29
-
30
-
31
-
32
-
33
-
34
-
35
-
36
-
37
-
38
-
39
-
40
-
41
-
42
-
43
-
44
-
45
-
46
-
47
-
48
-
49
-
50
-
51
-
52
-
53
 |
 |

Model 3002
➤
Owner’s Guide