Viking VGBQ53624 Natural Gas Conversion Kit - TNKVGBQ - Installation Instructi - Page 3
Vgbq/cvgbq T/t1/e And 100/300 Series Conversions
 |
View all Viking VGBQ53624 manuals
Add to My Manuals
Save this manual to your list of manuals |
Page 3 highlights
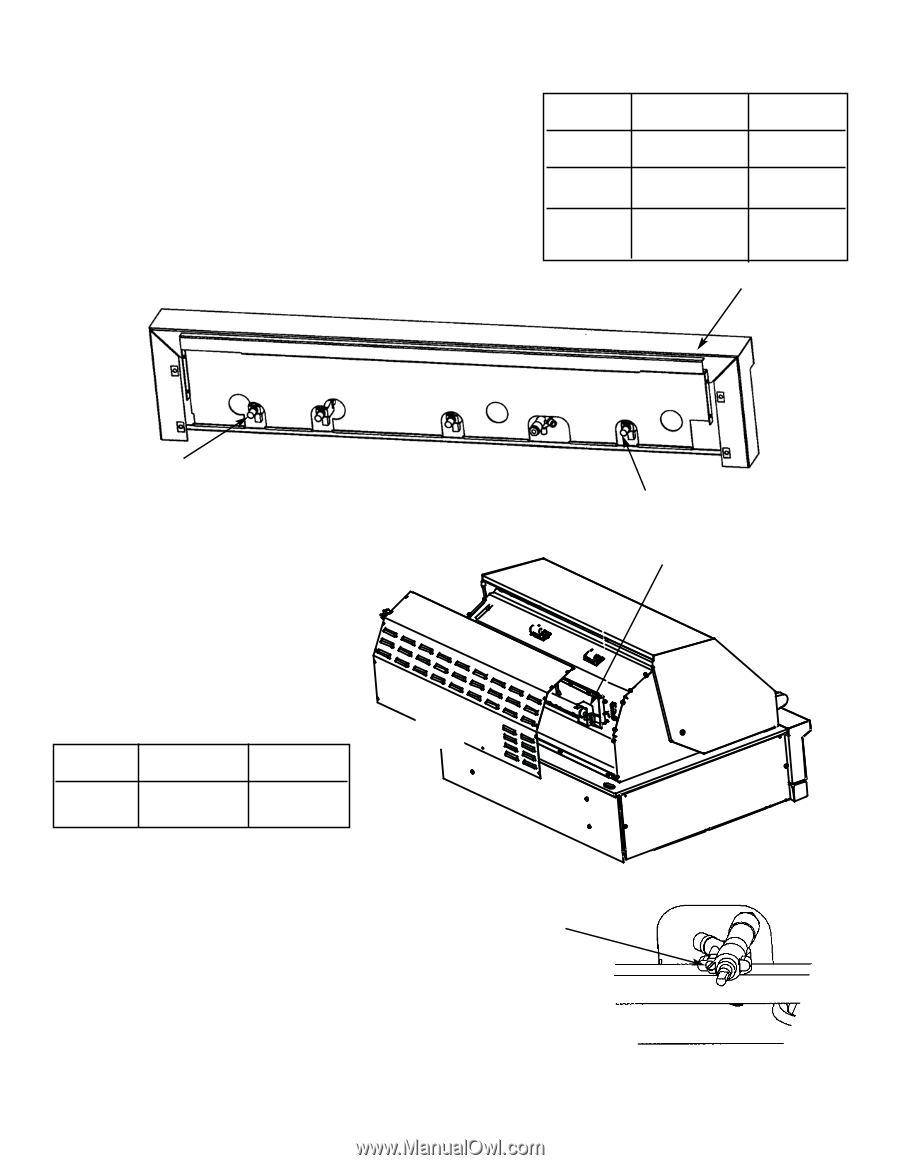
VGBQ/CVGBQ T/T1/E AND 100/300 SERIES CONVERSIONS To convert grill burners, side burner and smoker burner: 1. Remove all grates, flavor generators and stainless steel burners from the unit. 2. Look into the burner box back toward the control panel in order to located the orifice hoods. Remove the gas orifice hoods located on the grill burner valves. 3. Replace the orifice hoods with the correct gas orifice hoods supplied in the conversion kit. (See chart) 4. Replace the stainless steel burners, flavor generators and grates. Grill Burners Smoker Burners Side Burners Natural LP/Propane Orifice Hood Orifice Hood (3) - 40 (3) - #54 (2) - #51 (2) - #62 (2) - #49 (2) - #57 Landing ledge Rear side of control panel Smoker Burner Orifice hood To convert the rotissiere infrared burner: 1. Remove the back cover from the unit to expose the orifice hood to the infrared burner. 2. Remove the gas orifice hood located on the grill. 3. Replace with the gas orifice hood supplied in the conversion kit. 4. Replace the back cover. Infrared Burner Natural Orifice Hood LP/Propane Orifice Hood (1) or (2) - #48 (1) or (2) - #57 Depending on grill model Back Cover Grill Burner / Side Burner Orifice hoods Orifice hood To check LP/Propane to Natural Conversion of the rotissiere infrared burner: Ignite the rotissere burner and set it to low. If the burner will not hold a flame, it will be necessary to adjust the low setting. Remove the control panel to expose the rotissiere safety valve. Using a small flat head screwdriver turn the adjustment screw counterclockwse. Visually check the flame. When the burner is able to hold a flame on the low setting, the setting is complete. Replace the control panel. adjustment screw NOTE: For installation in areas with altitudes greater than 2000 feet, the orifices must be derated at 4% for every 1000 feet above 2000 feet. 3
-
 1
1 -
 2
2 -
 3
3 -
 4
4 -
 5
5 -
 6
6 -
 7
7 -
 8
8 -
 9
9 -
10
-
11
-
12
 |
 |