Viking VGBQ53624 Installation Instructions - Page 21
LP/Propane Tank Connection
 |
View all Viking VGBQ53624 manuals
Add to My Manuals
Save this manual to your list of manuals |
Page 21 highlights
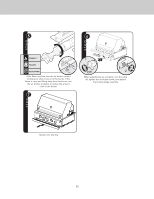
LP/Propane Tank Connection Outdoor grills orificed for use with LP/Propane gas come equipped with a high capacity hose/regulator assembly for connection to a standard 20 lb. LP/Propane cylinder equipped with a Type 1, QCC-1 connector. Hose assembly must comply with Elastomeric Composite Hose and Couplings for conducting Propane and Natural Gas, CAN/CGA-8.1 standard or the Theromplastic Hose and Hose Couplings for conducting Propane and Natural Gas 31/28" mNPaTle frlaorme aMdaanpiftoelrd Type 1, QCC-1 fitting for leaks with a soapy water solution. If bubbles appear, tighten the connection. Repeat until all leaks have been stopped. ALWAYS CHECK FOR LEAKS AFTER EVERY LP/PROPANE TANK CHANGE. Any joint sealant used must be an approved type and be resistive to the actions of LP/Propane gas. 3/8" male flare adapter CAN1-8.3 standard. (See LP/Propane tank requirements below). Each tank is supplied with a dust cap. Place dust cap on cylinder valve outlet whenever the cylinder is not in use. Only install the type of dust cap on the cylinder valve outlet that is provided with the cylinder valve. Other types of caps or plugs may result in leakage of propane. Attach the regulator assembly to the grill unit. Connect to the tank valve by screwing the Type 1, QCC-connector to the LP/Propane tank. Open the tank valve and check the connection between the regulator and the Connection 1/2" (1.3 cm) NPT male with a 3/8" (.95) flare adapter Regulator Assembly Type 1, QCC-1 connector NOTE: Tank must be mounted in vertical position for proper Ventilation Operating Pressure 10.0" W.C.P. LP/Propane. 21
-
 1
1 -
2
-
3
-
4
-
5
-
6
-
7
-
8
-
9
-
10
-
11
-
12
-
13
-
14
-
15
-
 16
16 -
 17
17 -
 18
18 -
 19
19 -
 20
20 -
 21
21 -
 22
22 -
 23
23 -
 24
24 -
 25
25 -
 26
26 -
27
-
28
 |
 |
