Viking VGBQ33603RE Use and Care Manual - Page 8
Using Grill
 |
View all Viking VGBQ33603RE manuals
Add to My Manuals
Save this manual to your list of manuals |
Page 8 highlights
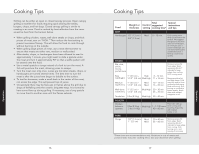
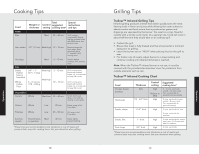
Operation Lighting Grill Lighting Grill Burners with Flash Tubes If you have just attempted to light the burner with the ignitor, allow five minutes for any accumulated gas to dissipate. Place the lit match through the grid next to the flash tube of the burner being lit. Keep your face as far away from the grill as possible. Make sure the match is adjacent to the flash tube. Push and turn the control knob until the "HIGH" position on the knob aligns with the indicator line on the control panel. Make sure you are turning the control knob that corresponds with the burner being lit. If the burner does not light in four seconds, turn the knob to "OFF," wait 5 minutes, and try again. If the burner will not light after several attempts, see the Troubleshooting section. Flash tube Lighting Infrared Rotisserie Burner The location of the infrared burner makes it more susceptible to strong wind conditions-more so than the protected grill burners. For this reason you should avoid using it during windy conditions. Open the canopy. Push in and turn the rotisserie control knob until the "HIGH" position on the knob aligns with the indicator line on the control panel and continue to hold in the knob. Press the electronic ignition button which corresponds to the rotisserie control knob. You will hear a clicking sound. After the burner lights, hold the rotisserie control knob in about 5 seconds longer or until the burner remains lit. Once lit, turn the control knob to the desired setting. If the burner does not light within 4 seconds, release and turn the control knob to "OFF". Wait 5 minutes for any accumulated gas to dissipate. If the burner does not light after several attempts, then the burner can be lit by holding a lit match to the burner (with the control knob pushed in at the light position). Push and turn the control knob until the "HIGH" position on the knob aligns with the indicator line on the control panel. Make sure you are turning the control knob that corresponds with the burner being lit. If relighting a hot burner, wait 5 minutes. Never leave the rotisserie control knob at "ON" if rotisserie is not in use. 14 Using Grill Before You Begin • The first time you use the grill, turn the control knob to "HIGH" and preheat racks for an additional 15-20 minutes. This allows the porcelain grates to be "seasoned." • Before each use, turn the control knob to "HIGH" and preheat for 5 -7 minutes. • Check to be certain the drip tray is in place. • Light the grill burners using the lighting instructions. • Place the food on the grill and cook to the desired doneness. Adjust heat setting, if necessary. The control knob may be set to any position between "HIGH" and "LOW." • Allow grill to cool before cleaning. (Drip tray should be cleaned after each use.) Canopy Thermometers Your outdoor grill is equipped with a thermometer on the canopy. The thermometer is designed to aide in the preheating of the grill and closed canopy grilling. The estimated cooking temperatures with the canopy closed are: WARM 150˚F (65˚C) COLD SMOKE 150˚F - 200˚F (65˚C - 93˚C) SMOKE 200˚F - 300˚F (93˚C - 149˚C) GRILL 300˚F - 750˚F (149˚C - 399˚C) Canopy Thermometer 450 400 350 300 250 500 550 600 650 200 150 700 750 °F 15 Operation
-
 1
1 -
2
-
 3
3 -
 4
4 -
 5
5 -
 6
6 -
 7
7 -
 8
8 -
 9
9 -
 10
10 -
 11
11 -
 12
12 -
 13
13 -
14
-
15
-
16
-
17
-
18
 |
 |
