Viking VBBO Installation Instructions - Page 4
Installation, Side Panel Installation End Of Run Only
 |
View all Viking VBBO manuals
Add to My Manuals
Save this manual to your list of manuals |
Page 4 highlights
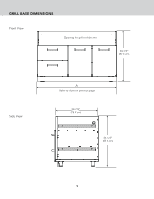
INSTALLATION 8. If desired, snap toe kick included with each unit to front legs. (See illustration #6). Illustration #6 Snap toe kick to front legs 9. SIDE PANEL INSTALLATION (End of Run Only) •Remove all drawers. (If applicable) •Remove all protective covering from panel and install using the #10 x 1/2" tek screws provided. (See Illustration #7) •Attach toe kick to legs (See Illustration #6). NOTE: FOR WALL INSTALLATIONS: The front portion of the side toe kick must be shortened to match the front toe kick. (See Illustration #7). The plastic material can be cut with any common type wood saw blade. FOR ISLAND INSTALLATIONS: The side, front, and rear toe kick must be modified (See Illustration #7) Illustration #7 1. Place side panel into area of the cabinet. 2. Attach from inside (front and rear) toe kick (A) Side toe kick (B) LH Side panel Installation shown (RH installs the same way) Front Toe Kick (A) Side Toe Kick (B) Rear Toe Kick (C) Toe Kick Dimensions Wall Installation Island Installation 16 3/4" (42.5 cm) 16 3/4" (42.5 cm) 27 1/4" (61.6 cm) 25 1/2" (64.8 cm) N/A 16 3/4" (42.5 cm) 4
-
 1
1 -
 2
2 -
 3
3 -
 4
4 -
 5
5 -
 6
6 -
 7
7 -
 8
8 -
 9
9 -
 10
10 -
11
-
12
-
13
-
14
-
15
-
16
-
17
-
18
-
19
-
20
-
21
-
22
-
23
-
24
-
25
-
26
-
27
-
28
-
29
-
30
-
31
-
32
-
33
-
34
-
35
-
36
 |
 |
