Viking RVDR330 Natural Gas Conversion Kit - RDNKR3 - Installation Instructions - Page 2
NAT Conversion Kit Instructions
 |
View all Viking RVDR330 manuals
Add to My Manuals
Save this manual to your list of manuals |
Page 2 highlights
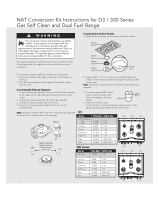
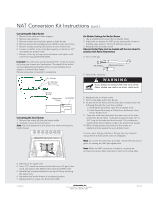
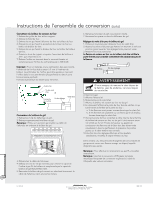
NAT Conversion Kit Instructions (cont.) Converting the Bake Burner 1. Remove oven racks and oven support. 2. Remove oven bottom. 3. Remove screws securing bake igniter to bake burner. 4. Remove screws securing bake burner shield to oven burner box. 5. Remove screws securing bake burner to oven burner box. 6. Loosen air shutter screw and adjust opening on burner to 3/8" and tighten air shutter screw. 7. Remove orifice by turning counterclockwise and replace with orifice from bag labeled #38 (2.58). Important: The orifice tip must be located 3/16" inside the burner for proper gas mixture and combustion. The depth of the orifice can be adjusted by turning the orifice counterclockwise (more depth) or clockwise (less depth). Reverse procedure as needed to reassemble. Air Shutter Air Shutter VoSleet tScd rew'a O rifice Hood Adjustment Sc rew Air Shutter Converting the Broil Burner 1. Remove the screws (4) from the broiler baffle. 2. Carefully remove the broiler burner Note: Pay close attention to the igniter wire while removing the broiler burner. Air Shutter Settings for Broiler Burner 1. Use a screwdriver to loosen the air shutter screw. 2. Adjust the air shutters for NAT gas by rotating the shutter to the fully open position. Your final settings may vary. 3. Retighten the air shutter screw. Bake and broiler flame must be checked with the door closed to properly check flame characteristics. 4. Turn on the gas. Air shutter Adjustment screw 5. Turn on the electricity. WARNING If you attempt to measure the inner cone of the flame, please use caution as burns could result. 6. Retighten the air shutter screw. 7. Turn on the bake and broiler burner. 8. As you watch the flame with the oven door closed, check the following through the oven door window: a. If the flames are yellow, open the air shutter more. b. If the flames blow away or flutter from the burner, close the air shutter more. 9. Open the oven door and check the inner cone of the bake and broiler burner flame. It should be approximately 1/2" to 3/4" long for the bake and broil burners. The combustion quality of the burner flames needs to be determined visually. 10. When all adjustments are made and the results are satisfactory then replace the oven bottom cover. In some cases, foreign particles in the gas line may cause an orange flame at first but this will soon disappear. Note: To convert the oven back to LP gas, reverse the instructions given for making the NAT gas adjustments. Note: When the NAT conversion is finished, complete the enclosed conversion label and place it next to the rating label. 3. Disconnect the igniter wire. 4. Use a 1/2" wrench to remove the broiler burner LP gas orifice hood and replace with NAT broiler burner hood #50 (1.87). 5. Reinstall the converted broiler burner by first firmly attaching the igniter wire. 6. Reposition the broiler burner in its original position. 7. Replace the four screws into the broiler baffle. F21303 EN VIKING RANGE, LLC 111 Front Street • Greenwood, Mississippi 38930 USA • (662) 455-1200 (020113)
-
 1
1 -
 2
2 -
 3
3 -
 4
4
 |
 |
