URC MXHP-R700 Owners Manual - Page 4
Before Getting Started, Using the Charging Cradle - programming
 |
View all URC MXHP-R700 manuals
Add to My Manuals
Save this manual to your list of manuals |
Page 4 highlights
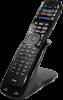
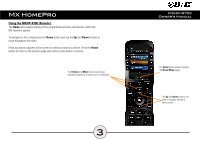
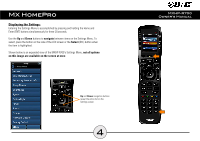
Before Getting Started: Using the Charging Cradle: Prior to installing an MX HomePro system, there are a few things to remember: Connect the 6V DC adapter into the power outlet and into the rear of the charging cradle (also connects to the remote for direct charging). Gently place the MXHP-R700 remote ● MX HomePro systems are designed for use on the home's local network. into the cradle. The remote automatically aligns itself to the contacts on the charging The hub can be connected to the home network through an Ethernet cable or base. The status light immediately illuminates: wirelessly via Wi-Fi. ● Red indicates that the remote is charging. ● Adding a TRF-ZW Z-Wave Gateway gives the MX HomePro system access to control the home's Z-Wave devices such as locks, thermostats, lighting, ● Blue indicates the remote is fully charged. cameras, and scenes. ● Programming is performed via the MX HomePro Editor. The smart home professional must log into this web portal in order to program all applicable MX HomePro devices. Further enhancements may be added, for all inquires please contact URC Technical Support. ● This remote communicates exclusively through 2.4 GHz Wi-Fi using b/g/n signals. Connecting the Lithium Polymer Battery: When getting ready to add the remote to the system or replacing a battery, perform the following steps: 1. Press the spring lock down to open the remote cover. 2. Place the battery (included) into the compartment making sure to align the contacts on the battery and the remote. 3. Replace the cover. 2
-
 1
1 -
 2
2 -
 3
3 -
 4
4 -
 5
5 -
 6
6 -
 7
7 -
 8
8 -
 9
9 -
 10
10 -
11
-
12
-
13
-
14
-
15
-
16
 |
 |
