Toshiba X100U User Manual - Page 23
Lamp replacement, Maintenance
 |
UPC - 883974142477
View all Toshiba X100U manuals
Add to My Manuals
Save this manual to your list of manuals |
Page 23 highlights
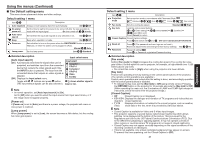
Lamp replacement A lamp is consumable supplies. If used for extended periods, images will appear dark, and the lamp could burn out. This is characteristic of a lamp, and is not malfunction. (The lifetime of the lamp depends on condition of use.) If this happens, replace it with a new one. WARNING • If the projector is mounted on the ceiling, it is recommended to use your Toshiba dealership when the lamp has to be exchanged. Uncovering the lamp while the projector is mounted on a ceiling may lead to a danger of damage from falling pieces of glass if the lamp is broken. Besides, working at high elevations can also be hazardous. Do not attempt to replace the lamp by yourself. • When replacing, always use lamp "TLPLW21" (sold separately). If the lamp other than the specified one is used, it may cause a malfunction or damage to the unit due to the difference in the connector shape or the lamp rate. CAUTION • If you have been using the projector, the lamp will be very hot, and may cause burn injuries. Wait for the lamp to cool (for longer than 1 hour) before replacing it. • If the lamp should break, please handle with care to avoid injury due to broken pieces and contact your dealer for repair service. 1 Unplug power cord. 2 Wait until lamp is sufficiently cooled. Wait for at least 1 hour. 3 Remove the outer lamp cover. Loosen a screw attached on the side of the outer lamp cover, and take the cover off by sliding in the direction of the arrow. Outer lamp cover 4 Remove the inner lamp cover. Remove the screws and carefully set them aside, and take off the inner lamp cover. Be sure not to loose the screws. Inner lamp cover 44 5 Pull out the lamp. Loosen the 3 lamp locking screws, pull up the handle, and press the tab to remove the lamp. Tab 6 Mount the new lamp. Align the orientation, press down the new lamp until the bottom is reached, and lock in place using the 3 lamp locking screws. 7 Replace the inner lamp cover. Inner lamp cover Tighten the screws removed in step 4 until the inner lamp cover is no longer loose. 8 Replace the outer lamp cover. Align the cover and slide in the direction of the arrow, then tighten the screw loosened in step 3 until the outer lamp cover is no longer loose. (Be sure to replace the outer lamp cover.) 9 Reset the lamp time. See the lamp's manual for instructions on resetting the lamp time. Outer lamp cover 45 Maintenance
-
 1
1 -
2
-
3
-
4
-
5
-
6
-
7
-
8
-
9
-
10
-
11
-
12
-
13
-
14
-
15
-
16
-
17
-
 18
18 -
 19
19 -
 20
20 -
 21
21 -
 22
22 -
 23
23 -
 24
24 -
 25
25 -
 26
26 -
 27
27 -
 28
28 -
29
 |
 |
