Toshiba DKVR60KU Owners Manual - Page 45
Settings For An External Device
 |
View all Toshiba DKVR60KU manuals
Add to My Manuals
Save this manual to your list of manuals |
Page 45 highlights
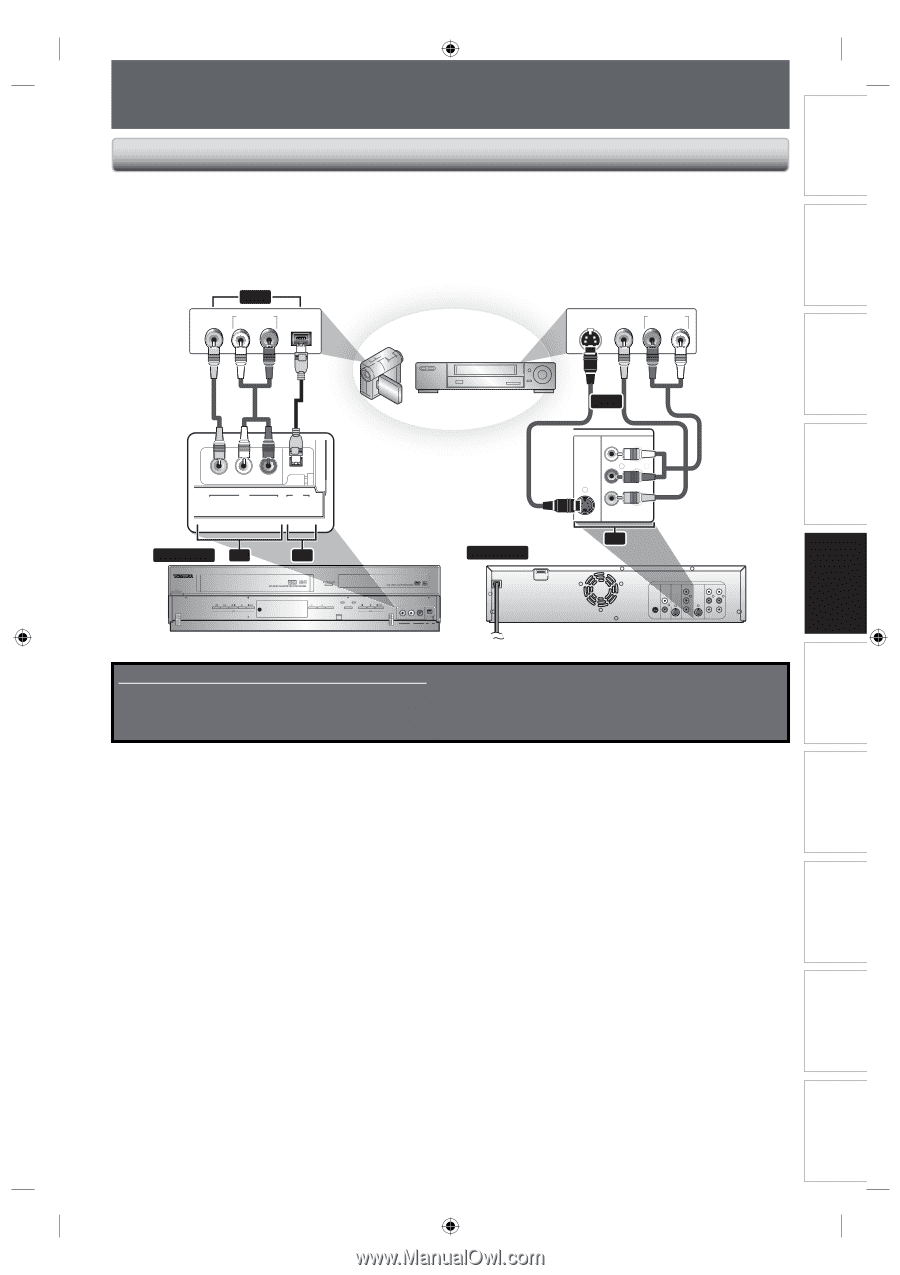
Introduction Connections Basic Setup SETTINGS FOR AN EXTERNAL DEVICE Connection to an External Device Connect the external device properly to the unit by using input jacks either L2 (Front) or L1 (Rear). When connecting an external device of monaural output to this unit, use AUDIO L jack of L2 (Front). Use S-video or the RCA audio/video cables for this connection. When connecting a DVC (digital video camcorder), it is recommended to connect the DVC with the front DV IN jack with a commercially available mini DV/Firewire cable. or VIDEO OUT AUDIO OUT L R DV-OUT external device (camcorder, VCR etc.) S-VIDEO VIDEO OUT OUT AUDIO OUT R L RCA video cable RCA audio cable DV cable (4-pin) L2 L3 VIDEO L R DV IN or to L2 & L3 L2 L3 to L1 TRACKING DUBBING VCR DVD SELECT L2 VIDEO L L3 R DV IN front of this unit Supplied cables used in this connection are as follows: • RCA audio cable (L/R) x 1 • RCA video cable x 1 Please purchase the rest of the necessary cables at your local store. S-video cable or RCA video cable RCA audio cable S-VIDEO IN ---AUDIO---OUT (L1) L L IN R R IN ---VIDEO---OUT HDMI OUT L1 DIGITAL AUDIO OUT AUDIO OUT DVD/VCR S-VIDEO COMPONENT S-VIDEO VIDEO OUT Y IN ---AUDIO---OUT (L1) L L COAXIAL L OUT R PB /CB IN PR /CR R R IN ---VIDEO---OUT rear of this unit Disc Management Recording Playback Editing Function Setup VCR Function Others E9PKBUD_DKVR60KU_EN.indd 45 EN 45 8/11/2009 4:00:39 PM
-
 1
1 -
2
-
3
-
4
-
5
-
6
-
7
-
8
-
9
-
10
-
11
-
12
-
13
-
14
-
15
-
16
-
17
-
18
-
19
-
20
-
21
-
22
-
23
-
24
-
25
-
26
-
27
-
28
-
29
-
30
-
31
-
32
-
33
-
34
-
35
-
36
-
37
-
38
-
39
-
 40
40 -
 41
41 -
 42
42 -
 43
43 -
 44
44 -
 45
45 -
 46
46 -
 47
47 -
 48
48 -
 49
49 -
 50
50 -
51
-
52
-
53
-
54
-
55
-
56
-
57
-
58
-
59
-
60
-
61
-
62
-
63
-
64
-
65
-
66
-
67
-
68
-
69
-
70
-
71
-
72
-
73
-
74
-
75
-
76
-
77
-
78
-
79
-
80
-
81
-
82
-
83
-
84
-
85
-
86
-
87
-
88
-
89
-
90
-
91
-
92
-
93
-
94
-
95
-
96
-
97
-
98
-
99
-
100
-
101
-
102
-
103
-
104
-
105
-
106
-
107
-
108
-
109
-
110
-
111
-
112
-
113
 |
 |