Timex TM80 User Guide - Page 7
Setting Up the TM80, Using the Alarms - mp3 alarm clock
 |
UPC - 758859205472
View all Timex TM80 manuals
Add to My Manuals
Save this manual to your list of manuals |
Page 7 highlights
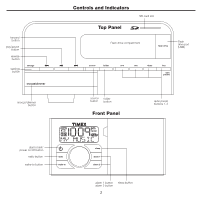
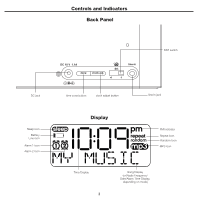
Setting Up the TM80 This unit is a preset Clock/Radio: the clock is preset to Eastern Standard Time at the factory. A few steps will match settings to where you live. Setting Time Zone and Daylight Savings Time (DST) 1. Depending on your location and whether or not DST (Daylight Saving Time) is in effect, set the DST Switch located on the back of the unit to +1 to advance the time one hour or to -1 to turn it back one hour. 2. Press and hold the Time Zone Button located on the back of the unit for about 2 seconds until the current Time Zone flashes. Press the > Button to change the time zone. 3. Press Time Zone Button again (or if no key is pressed within 10 seconds) to exit the time zone setting mode. 4. If the time displayed is not correct, please see Setting Time and Calendar (below) to set the clock. Setting Time and Calendar 1. Press and hold the Clock Adj Button located on the back of the unit for 2 seconds until the time display flashes. Press the button again to accept the current time setting or press the > Button (hold for faster setting) until the correct time is displayed. Remember to set the correct AM or PM time. An icon in the upper right hand corner is the PM Indicator; there is no AM indicator.Press the Clock Adj Button to accept the time setting. 2. The display will change to the year flashing. Press the Clock Adj Button to accept the year setting or press the > Button until the current year is displayed. Holding the button for a few seconds will advance or reverse rapidly. Press the Clock Adj Button to confirm year setting after adjustment. 3. The display will change to the date flashing. Press the Clock Adj Button to accept the date setting or press the > Button (hold for faster setting) until the correct date is displayed. 4. Press the Clock Adj Button again (or if no key is pressed within 10 seconds) to exit the time and calendar setting mode. Using the Alarms Setting the Alarms 1. Press and hold the Alarm 1 Button for 2 seconds until the display flashes. Press the > Button to set the alarm time. Remember to set the correct AM or PM time. 2. Press the Alarm 1 Button again or wait for 10 seconds. Alarm is now armed, indicated by the numbered alarm clock icon. 3. To set Alarm 2 just repeat step 1 and 2 above but using Alarm 2 Button. 4. Press the Wake-to Button located on the front of the unit to wake to radio, MP3/WMA (SD card or flash drive) or Buzzer. Both alarms will wake to the same sound source. If the wake-to source is set to MP3/WMA and no device is present, the alarm will default to the buzzer alarm. 5. To wake to a particular MP3/WMA track/sound file, press and hold the Wake-to Button while the desired track is playing (see Listening to MP3 or WMA sound files on page 6 for details on playing and selecting sound files). A beep will confirm your selection. Reviewing Alarm Times and Turning Alarm Function On and Off 1. Press Alarm 1 (or Alarm 2) Button once to review the currently set alarm time(s). 2. Press the button again to arm or disarm the alarm. When the alarm is armed, the related alarm icon appears in display. When no alarm icon is showing, the alarm is off and will not sound. 5
-
 1
1 -
 2
2 -
 3
3 -
 4
4 -
 5
5 -
 6
6 -
 7
7 -
 8
8 -
 9
9 -
 10
10 -
 11
11 -
 12
12 -
13
-
14
 |
 |
