Stihl MSE 250 C-Q Instruction Manual - Page 31
Checking Chain Lubrication
 |
View all Stihl MSE 250 C-Q manuals
Add to My Manuals
Save this manual to your list of manuals |
Page 31 highlights
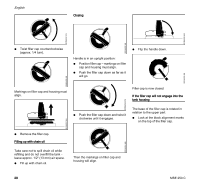
Checking oil level 1 English Checking Chain Lubrication 001BA238 KN 9931BA040 KN Left: Right: Base of filler cap is rotated to the closed position - interior marking (1) is aligned with the exterior marking. Base of filler cap is in the correct position for installation - interior marking is below the clip. It does not align with the exterior marking. N If your cap is in the closed position: with the filler cap in the filling neck, twist it counterclockwise until it drops into its seat. N Continue to twist the filler cap counterclockwise (approx. 1/4 turn) - this will twist the base of the cap into the correct position for installation. N While pushing down on the cap, twist the filler cap clockwise and close it - see section "Closing." 001BA256 KN 1 N Check the oil level regularly during operation. N Refill the oil tank when the oil level reaches the "min" mark (1) or earlier. If the oil level in the tank does not go down, the reason may be a problem in the oil supply system: Check chain lubrication, clean the oilways and contact your dealer for assistance if necessary. STIHL recommends that you have servicing and repair work carried out exclusively by an authorized STIHL servicing dealer. The saw chain must always throw off a small amount of oil. NOTICE Never operate your saw without chain lubrication. If the chain runs dry, the whole cutting attachment will be irretrievably damaged within a very short time. Always check chain lubrication and the oil level in the tank before starting work. Every new chain has to be broken in for about 2 to 3 minutes. After breaking in the chain, check chain tension and adjust if necessary - see "Checking Chain Tension". 143BA024 KN MSE 250 C 29
-
 1
1 -
2
-
3
-
4
-
5
-
6
-
7
-
8
-
9
-
10
-
11
-
12
-
13
-
14
-
15
-
16
-
17
-
18
-
19
-
20
-
21
-
22
-
23
-
24
-
25
-
 26
26 -
 27
27 -
 28
28 -
 29
29 -
 30
30 -
 31
31 -
 32
32 -
 33
33 -
 34
34 -
 35
35 -
 36
36 -
37
-
38
-
39
-
40
-
41
-
42
-
43
-
44
-
45
-
46
-
47
-
48
-
49
-
50
-
51
-
52
-
53
-
54
-
55
-
56
-
57
-
58
-
59
-
60
-
61
-
62
-
63
-
64
-
65
-
66
-
67
-
68
-
69
-
70
-
71
-
72
-
73
-
74
-
75
-
76
-
77
-
78
-
79
-
80
-
81
-
82
-
83
-
84
-
85
-
86
-
87
-
88
-
89
-
90
-
91
-
92
-
93
-
94
-
95
-
96
-
97
-
98
-
99
-
100
 |
 |
