Stihl MS 194 C-E Instruction Manual - Page 10
NA NB NC
 |
View all Stihl MS 194 C-E manuals
Add to My Manuals
Save this manual to your list of manuals |
Page 10 highlights
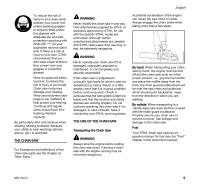
English Misaligned, Damaged or Broken Cap WARNING A B C 1 1 1 22 2 If the cap does not drop fully into the fuel tank opening when the positioning marks (1, 2) line up, or if it does not tighten properly when turned, the base of the cap may be prematurely rotated in relation to the top. Such misalignment can result from handling, cleaning or an improper attempt at tightening. - Illustrations A and B: The base of the cap is prematurely rotated to the closed position and is not in the correct starting position for installation. The tank will not seal in this configuration. Note: in Illustrations A and B, the interior positioning marks (1) are in line with the exterior position marks (2). - Illustration C: The bottom of the cap is in the correct starting position for installation. Note: In Illustration C, the interior positioning mark (1) is under the grip and not in line with the outer position mark (2). To return the base of the cap to the proper starting position for installation: 0000-GXX-6421-A0 0000-GXX-6422-A1 A B C 1 2 N Drop the cap into the fuel tank opening (A). N Next, turn the cap counterclockwise with slight pressure until it drops fully into the fuel tank opening (approximately 1/4 turn) (B). This will rotate the base of the cap into the correct starting position for installation (C). The exterior positioning mark (1) on the cap will line up with the "unlocked" symbol (2) on the fuel tank housing. The interior positioning mark should be under the grip and not in line with the outer positioning mark (1). N Then, turn the cap clockwise, closing it normally. If your fuel cap still does not tighten properly, it may be damaged or broken. Stop using the chain saw and take it to your authorized STIHL dealer for repair. Vapor Lock WARNING Vapor lock occurs when fuel in the fuel line or carburetor vaporizes, causing bubbles to block the free flow of liquid fuel into the carburetor. Vapor lock cannot be relieved or affected by opening the fuel tank. Removing the fuel filler cap without first allowing the chain saw to cool adequately can result in fuel spraying. Always follow the instructions in this section when removing the fuel cap. To relieve vapor lock: - Place the Master Control Lever in the cold start position l and pull the starter cord approximately 20 times to clear the vapor and send liquid fuel into the carburetor. - To start the chain saw, move the Master Control Lever to the starting throttle position n and pull the starter cord approximately 10 times. - If your chain saw will not restart, or if vapor lock occurs again, the chain saw is being used in conditions too extreme for the fuel being used. Discontinue use and let the engine cool completely before attempting to start the chain saw. Before Operation Take off the chain guard (scabbard) and inspect the chain saw for proper condition and operation. (See the maintenance chart near the end of the instruction manual.) WARNING Always check your chain saw for proper condition and operation before starting, particularly the throttle trigger, throttle trigger lockout, stop switch and cutting attachment. The throttle trigger must move freely and always spring back to the idle position. The Master Control Lever / stop switch must move easily to STOP, 0 or †. Never attempt to modify the controls or safety devices. 8 MS 194 C
-
 1
1 -
2
-
3
-
4
-
 5
5 -
 6
6 -
 7
7 -
 8
8 -
 9
9 -
 10
10 -
 11
11 -
 12
12 -
 13
13 -
 14
14 -
 15
15 -
16
-
17
-
18
-
19
-
20
-
21
-
22
-
23
-
24
-
25
-
26
-
27
-
28
-
29
-
30
-
31
-
32
-
33
-
34
-
35
-
36
-
37
-
38
-
39
-
40
-
41
-
42
-
43
-
44
-
45
-
46
-
47
-
48
-
49
-
50
-
51
-
52
-
53
-
54
-
55
-
56
-
57
-
58
-
59
-
60
-
61
-
62
-
63
-
64
-
65
-
66
-
67
-
68
-
69
-
70
-
71
-
72
-
73
-
74
-
75
-
76
-
77
-
78
-
79
-
80
-
81
-
82
-
83
-
84
-
85
-
86
-
87
-
88
-
89
-
90
-
91
-
92
-
93
-
94
-
95
-
96
-
97
-
98
-
99
-
100
-
101
-
102
-
103
-
104
-
105
-
106
-
107
-
108
-
109
-
110
-
111
-
112
-
113
-
114
-
115
-
116
-
117
-
118
-
119
-
120
-
121
-
122
-
123
-
124
-
125
-
126
-
127
-
128
-
129
-
130
-
131
-
132
-
133
-
134
-
135
-
136
 |
 |
