Stihl FH-KM Instruction Manual - Page 13
Adjusting the Cutter Bar
 |
View all Stihl FH-KM manuals
Add to My Manuals
Save this manual to your list of manuals |
Page 13 highlights
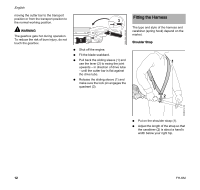
0000-GXX-1684-A0 English 11 12 Once the end of the drive tube is inserted beyond the slot in the clamp (12): N Push the gearbox (11) fully home as far as stop. N Tighten down the clamp screws moderately. N Line up the gearbox (11) with the powerhead. N Tighten down the clamp screws firmly. 0000-GXX-1682-A0 Adjusting the Cutter Bar Angle Adjuster - 145° 145° The angle of th cutter bar can be adjusted upwards in 4 stages from 0° (straight) to 55°, and downwards in 7 stages from 0° to 90° (right angle facing down). There are therefore 12 possible working positions. WARNING To reduce the risk of injury, carry out the adjustment only when the cutting blades are at a standstill - engine at idle speed. WARNING The gearbox gets hot during operation. To reduce the risk of burn injury, do not touch the gearbox. 0000-GXX-1683-A0 WARNING To reduce the risk of injury, never touch the blades while making adjustments. 2 3 1 N Pull back the sliding sleeve (1) and use the lever (2) to adjust the joint by one or several holes. N Release the sliding sleeve (1) and make sure the lock pin engages the quadrant (3). Transport Position The cutter bar can be folded flat against the drive tube and locked in position to save space during transportation. WARNING To reduce the risk of injury, always shut off the engine - depress stop switch - and fit the blade scabbard before 0000-GXX-1685-A0 FH-KM 11
-
 1
1 -
2
-
3
-
4
-
5
-
6
-
7
-
 8
8 -
 9
9 -
 10
10 -
 11
11 -
 12
12 -
 13
13 -
 14
14 -
 15
15 -
 16
16 -
 17
17 -
 18
18 -
19
-
20
-
21
-
22
-
23
-
24
-
25
-
26
-
27
-
28
-
29
-
30
-
31
-
32
-
33
-
34
-
35
-
36
-
37
-
38
-
39
-
40
-
41
-
42
-
43
-
44
 |
 |
