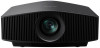
Sony VPL-VW760ES Operating Instructions - Page 8
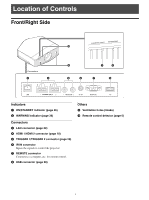
To adjust the horizontal position, To adjust the tilt of the installation surface, Top view, Side view
 |
View all Sony VPL-VW760ES manuals
Add to My Manuals
Save this manual to your list of manuals |
Page 8 highlights
To adjust the horizontal position Press
-
 1
1 -
2
-
 3
3 -
 4
4 -
 5
5 -
 6
6 -
 7
7 -
 8
8 -
 9
9 -
 10
10 -
 11
11 -
 12
12 -
 13
13 -
14
-
15
-
16
-
17
-
18
-
19
-
20
-
21
-
22
-
23
-
24
-
25
-
26
-
27
-
28
-
29
-
30
-
31
-
32
-
33
-
34
-
35
-
36
-
37
-
38
-
39
-
40
-
41
-
42
-
43
-
44
-
45
-
46
-
47
-
48
-
49
-
50
-
51
-
52
-
53
-
54
 |
 |

8
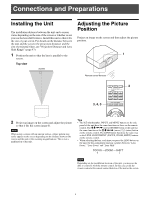
To adjust the horizontal position
Press
<
/
,
.
The picture projected on the screen moves right or left by
a maximum of 31% of the screen width from the center of
the lens.
Top view
To adjust the vertical position
Press
M
/
m
.
The picture projected on the screen moves up by a
maximum of 85% or moves down by a maximum of 80%
of the screen height from the center of the lens.
Side view
The range to move the picture projected on the screen can be
adjusted only within the octagon area illustrated below. For details,
see “Projection Distance and Lens Shift Range” (page 47).
Range of movement of the projected picture
To adjust the tilt of the installation surface
If the unit is installed on an uneven surface, use the front
feet (adjustable) to keep the unit level.
•
If the unit is tilted up or down, the projected image may be
trapezoidal.
•
Be careful not to catch your finger when turning the front feet
(adjustable).
31%
31%
1 screen width
: Picture position when moving the
picture to the left at maximum
: Picture position when moving the
picture to the right at maximum
85%
80%
1 screen
height
: Picture position when moving the
picture upward at maximum
: Picture position when moving the
picture downward at maximum
Note
Notes
0.85V
0.31H
H: Width of the projected picture
V: Height of the projected picture
0.31H
0.8V
Projected Picture
Front feet (adjustable)
Turn to adjust.