Sony PCWA-DE30 Troubleshooting Guide - Page 2
Case 2, Case 3, Case 4, Case 11, Case 12, Case 13, Case 14, Case 5, Case 6, Case 7, Case 8, Case 9, - manual
 |
View all Sony PCWA-DE30 manuals
Add to My Manuals
Save this manual to your list of manuals |
Page 2 highlights
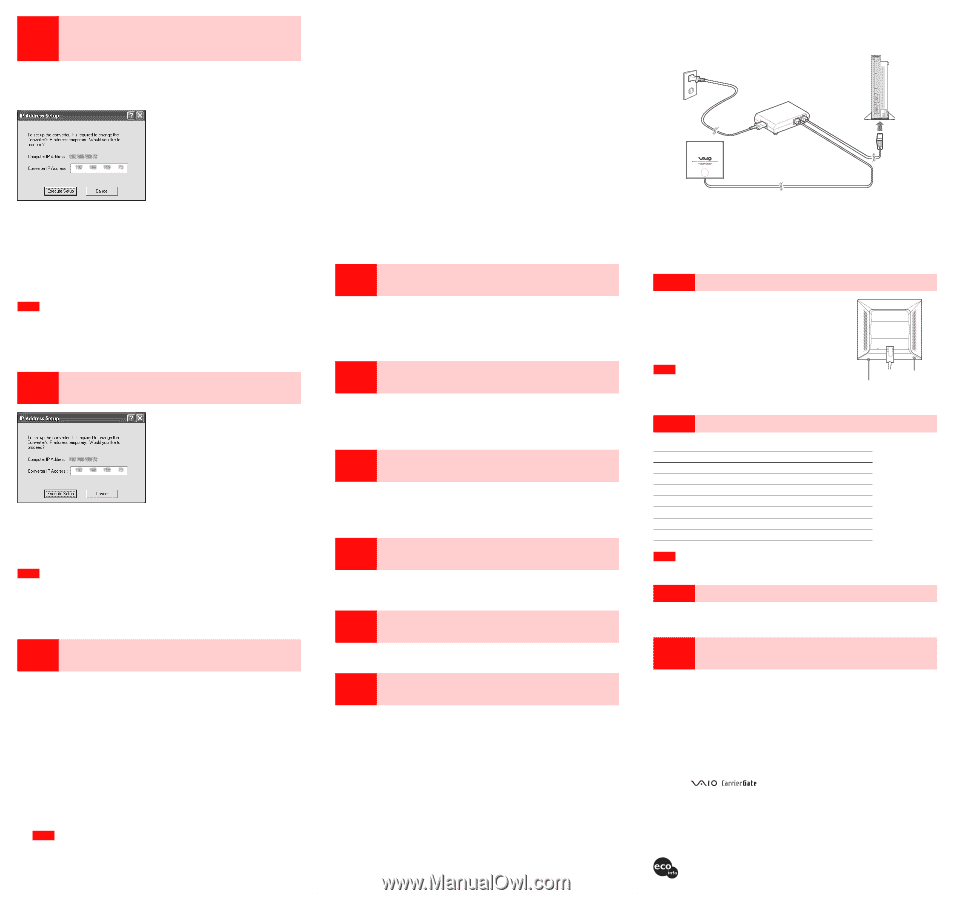
Case 2 When starting the Converter Setup Utility, the message "Failed to open Converter Setup Page. Do you want to see Online Help?" appears. Did the "IP Address Setup" screen appear? If communication cannot be established with the current IP address of the computer connected to the Wireless LAN Converter and the IP address of the Wireless LAN Converter, the following dialog box appears. If you click "Cancel" in this dialog box, the Wireless LAN Converter Setup Page cannot be displayed. 1 Click "Start", point to "Programs" (when using the Windows XP operating system, point to "All Programs"), point to "Wireless LAN", and then click "Converter Setup" to restart the Converter Setup Utility. 2 When the "IP Address Setup" dialog box appears, verify its contents, and then click "Execute Setup". The IP address of the Wireless LAN Converter is temporarily changed so that the computer can open the Wireless LAN Converter Setup Page. Note If the computer connected to the Wireless LAN Converter is also connected to another network, make sure that the new IP address does not duplicate the address of a device on that network. z Hint When you turn off or restart the Wireless LAN Converter, the IP address reverts to its original setting. Case 3 When starting the Converter Setup Utility, the "IP Address Setup" dialog box appears. If communication cannot be established with the current IP address of the computer connected to the Wireless LAN Converter and the IP address of the Wireless LAN Converter, the dialog box above appears. Verify that the IP address of the Wireless LAN Converter is acceptable, and click "Execute Setup". The IP address of the Wireless LAN Converter is temporarily changed so that the computer can open the Wireless LAN Converter Setup Page. Note If the computer connected to the Wireless LAN Converter is also connected to another network, make sure that the new IP address does not duplicate the address of a device on that network. z Hint When you turn off or restart the Wireless LAN Converter, the IP address reverts to its original setting. Case 4 Cannot display the Wireless LAN Converter Setup Page. 1 Is the temporary address assigned to the Wireless LAN Converter used by another device or computer on the network? 1 Disconnect and reconnect the power cord of the Wireless Unit cable to restart the Wireless LAN Converter. 2 Start the Converter Setup Utility. 3 In the "IP Address Setup" dialog box, replace the current Wireless LAN Converter IP address with an unused address, and then click "Execute Setup". 2 Is the Web browser of the computer used for the Wireless LAN Converter setup configured to use a proxy server? Make sure that no proxy setting is enabled for the IP address of the Wireless LAN Converter. Note While the proxy server setting is disabled, it may not be possible to display other Web pages except the Wireless LAN Converter Setup Page. Example 1: Using Microsoft Internet Explorer 1 On the "Tools" menu, click "Internet Options". The "Internet Options" dialog box appears. 2 On the "Connections" tab, click "LAN Settings". The "Local Area Network (LAN) Settings" dialog box appears. 3 If the "Use a proxy server for your LAN (These settings will not apply to dial-up or VPN connections)." dialog box is selected, clear the check box and click "OK". 4 When the Wireless LAN Converter setup is complete, return the proxy setting to its original condition. Example 2: Using Netscape 1 Start the Web browser on the computer used for the Wireless LAN Converter setup. 2 On the "Edit" menu, click "Preferences". 3 In "Category", click "Advanced" and click the "Proxies" button. 4 Select "Direct connection to the Internet" and click "OK". 5 When the Wireless LAN Converter setup is complete, return the proxy setting to its original condition. Case 5 On the Wireless LAN Converter Setup Page, the Encryption (WEP) key input field cannot be used. Did you select "Enabled" under "Encryption (WEP)"? The Encryption (WEP) key input field is only available if the "Enabled" setting is selected. Set "Encryption (WEP)" to "Enabled", select the "Key Length", and then enter the Encryption (WEP) key in the input field. The prescribed length of the string depends on the "Key Length" setting. Check the indication above the input field. Case 6 The STATUS indicator is slowly flashing white, but communication with the Access Point is not possible. Did you input the Encryption (WEP) key correctly? Even if the Network Name (SSID) is correct, an incorrect Encryption (WEP) key prevents communication with the Access Point. Check the Encryption (WEP) key setting of the Access Point and re-enter the correct Encryption (WEP) key of the Wireless LAN Converter. Case 7 Unable to connect after the Access Point settings are changed. Did you also change Wireless LAN Converter settings? If settings such as the Network Name (SSID) and Encryption (WEP) key are changed, the Wireless LAN Converter settings must also be changed to match the new settings. Refer to "If You Change the Access Point Settings" in the Quick Start Guide to change the settings of the Wireless LAN Converter. Case 8 Unable to connect after the access control (MAC address filtering) of the Access Point is enabled. When setting up the access control of the Access Point, enter this MAC address. First the Wireless LAN Converter connects with its own address, then switches to the one of the wireless communication device. Some printers require that you set both addressed to be able to connect to them. Case 9 The time is not correct even after specifying an NTP server (Time server). In the Advanced Setup page of the Wireless LAN Converter, set a DNS server. Case 10 Cannot communicate with a device other than the computer used for setup. 1 Did you set up the device correctly for use on a network? Configure the required settings to enable the device on a network. For details, refer to the documentation of the device. 2 Did you connect the device correctly to the Wireless LAN Converter? Verify that connections are established as shown below. Power cord Power Unit Wireless Unit Wireless Unit cable Ethernet cable (not included) 3 Did you wait a few moments when changing the connection from the computer used for setup to the other device? After disconnecting the cable from the computer used for setup, do not plug it immediately into the new device. Wait at least 10 seconds before plugging it. z Hint The device information accumulated on the computer takes about 10 seconds to be deleted. Case 11 Forgot settings or want to reset. When the Wireless LAN Converter is on, use a paper clip or a similar object to hold down the reset switch located on the bottom of the Wireless LAN Converter. Release the switch when the STATUS indicator starts to flash red. The Wireless LAN Converter restarts automatically and all settings revert to the factory defaults. Configure the Wireless LAN Converter again as needed. Note Be careful not to press the Quick Setup switch when you reset the Wireless LAN Converter. Pressing the Quick Setup switch does not reset the Wireless LAN Converter. Quick Setup Reset switch switch Case 12 What are the factory default settings? The factory default settings are as follows. Item Network Name (SSID) Encryption (WEP) Connection Mode IP Address Setting STATUS Indicator (LED) Time Server (NTP Server) Quick Setup Switch Setting - Disabled Access Point Network Obtain an IP address automatically (DHCP) On - Enabled Note In the table above, "-" indicates blank settings. Case 13 What are the STATUS indicator functions? The STATUS indicator has various patterns that show the operation status of the Wireless LAN Converter. For details, refer to Read This First or to the Converter Setup Utility Help. Case 14 What are the Wireless LAN Converter functions and how can I make advanced settings? Click "Start", point to "Programs" ("All Programs" when using the Windows XP operating system), "Wireless LAN", and click "Converter Setup Help". Help appears. z Hint For updates and connection information, refer to product information and Q&A search at the Sony Online Support (http://www.sony.com/wirelesslansupport). • Sony, VAIO, , , and the Eco Info logo are trademarks of Sony Corporation. • Microsoft and Windows are registered trademarks of Microsoft Corporation in the United States and/or other countries. • In this manual, Microsoft® Windows® Millennium Edition is referred to as Windows Me, Microsoft® Windows® 2000 Professional is referred to as Windows 2000, Microsoft® Windows® XP Home Edition and Microsoft® Windows® XP Professional are referred to as Windows XP. • Netscape is registered trademark of Netscape Communications Corporation. • All other names of systems, products and services are trademarks of their respective owners. • In the manual, the ™ or ® marks are not specified. Printed on 100% recycled paper using VOC (Volatile Organic Compound)-free vegetable oil based ink.
-
 1
1 -
 2
2
 |
 |