Sony PCV-RZ36G VAIO User Guide - Page 148
Capturing video clips using Movie mode, Cam/Mic Selection
 |
View all Sony PCV-RZ36G manuals
Add to My Manuals
Save this manual to your list of manuals |
Page 148 highlights
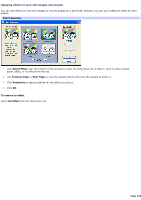
Capturing video clips using Movie mode To set Movie mode preferences 1. Start Network Smart Capture software and connect your compatible i.LINK® digital camera or camcorder to your computer with an i.LINK cable (optional). 2. Click Movie. 3. Click Change Setting to view the available options for your movie capture. Mov ie Clip Setting window The Movie Clip Setting window has four tabs: Basic - Select a folder destination for your movies when recording video clips. Capturing Format - Adjust the image quality, reduce image noise, and set the maximum recording time for your movie capture. Common - Enable or disable the sound and animation effects; enable or disable sample movie sound; and enable or disable automatic dialup connection for uploading images. Cam/Mic Selection - Select your primary camera and microphone. 4. Click each tab to view options and set preferences. To apply effects to an movie, see Applying effects to your still images and movies. You can remove all special effects by clicking the No Effects button. To capture video content in Movie mode 1. Use your digital camcorder to locate the view(s) you want to capture. When you see it in either the Finder Window or your camcorder's viewfinder, click Record to begin recording your movie. 2. Click Stop when you have finished recording your video. The first frame of your movie appears in the Data list to the right of the Finder Window. Network Smart Capture automatically stops recording according to the recording time set in the Movie Clip Setting window. 3. You can review your movie in the Finder Window by double-clicking the movie thumbnail in the data list. Page 148
-
 1
1 -
2
-
3
-
4
-
5
-
6
-
7
-
8
-
9
-
10
-
11
-
12
-
13
-
14
-
15
-
16
-
17
-
18
-
19
-
20
-
21
-
22
-
23
-
24
-
25
-
26
-
27
-
28
-
29
-
30
-
31
-
32
-
33
-
34
-
35
-
36
-
37
-
38
-
39
-
40
-
41
-
42
-
43
-
44
-
45
-
46
-
47
-
48
-
49
-
50
-
51
-
52
-
53
-
54
-
55
-
56
-
57
-
58
-
59
-
60
-
61
-
62
-
63
-
64
-
65
-
66
-
67
-
68
-
69
-
70
-
71
-
72
-
73
-
74
-
75
-
76
-
77
-
78
-
79
-
80
-
81
-
82
-
83
-
84
-
85
-
86
-
87
-
88
-
89
-
90
-
91
-
92
-
93
-
94
-
95
-
96
-
97
-
98
-
99
-
100
-
101
-
102
-
103
-
104
-
105
-
106
-
107
-
108
-
109
-
110
-
111
-
112
-
113
-
114
-
115
-
116
-
117
-
118
-
119
-
120
-
121
-
122
-
123
-
124
-
125
-
126
-
127
-
128
-
129
-
130
-
131
-
132
-
133
-
134
-
135
-
136
-
137
-
138
-
139
-
140
-
141
-
142
-
 143
143 -
 144
144 -
 145
145 -
 146
146 -
 147
147 -
 148
148 -
 149
149 -
 150
150 -
 151
151 -
 152
152 -
 153
153 -
154
-
155
-
156
-
157
-
158
-
159
-
160
-
161
-
162
-
163
-
164
-
165
-
166
-
167
-
168
-
169
-
170
-
171
-
172
-
173
-
174
-
175
-
176
-
177
-
178
-
179
-
180
-
181
-
182
-
183
-
184
-
185
-
186
-
187
-
188
-
189
-
190
-
191
-
192
-
193
-
194
-
195
-
196
-
197
-
198
-
199
-
200
-
201
-
202
-
203
-
204
-
205
-
206
-
207
-
208
-
209
-
210
-
211
-
212
-
213
-
214
-
215
-
216
-
217
-
218
-
219
-
220
-
221
-
222
-
223
 |
 |
