Sony BKM-FW50 Operating Instructions (Large File - 32.99 MB) - Page 9
Preparations, Using, Network, Functions
 |
View all Sony BKM-FW50 manuals
Add to My Manuals
Save this manual to your list of manuals |
Page 9 highlights
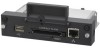
Preparations for Using the Network Functions The BKM-FW50 can be connected to a network with 10BASE-T/100BASE-TX LAN cable. When connected to a LAN, the IP addresses of the BKM-FW50 can be set using one of the following two methods. Consult your network administrator regarding details about IP address selection. • Assigning a fixed IP address to the BKM-FW50 Normally this method should be used. • Automatically obtaining an IP address If the network to which the BICM-FW50 is connected has a DHCP server, you can have the DHCP server automatically assign an IP address. Note that in this case the IP address will change every time the display in which the BKMFW50 is installed is turned on. Assigning a fixed IP address to the BKM-FW50 Note that a separate IP address is necessary for the display control function and for the still image/video playback function. Regarding details of IP address selection, consult your network administrator. Setting an IP address for the display control function First, assign an IP address to the display control function, using the following procedure. The IP address assigned in this way is used for railing the display control function of the BKM-FW50 from a computer on the network. Also consult the operating instructions of the display. 3 Press the MENU button on the display to bring up the main menu. 4 Use the *14 buttons to select "INITIAL SETUP/INFORMATION" and press the ENTER button. The "INITIAL SETUP/INFORMATION" menu appears. 5 Use the 114, buttons to select "IP Address Setup" and press the ENTER button. 6 Use the *14 buttons to select "Manual" and press the ENTER button. 7 Enter the necessary items. I) Use the 1/4 buttons to select the item to enter manually and press the ENTER button. A cursor appears in the leftmost field of the selected item. 2) Use the 1/4 buttons or the numeric buttons on the remote control to enter a three-digit number (0 - 255). When you press the ENTER button or the button, the cursor moves to the next field on the right. Enter a number in the same way. 3) When all four fields of an item have been set, pressing the ENTER button or the milP button confirms the entry for that item. 4) Make settings for the other items in the same way. 8 Use the 1/4 buttons to select "Execute" and press the ENTER button. Next, assign an IP address to the still image/video playback function. 1 Connect the BKIvl-FW50 installed in the display to the network, using suitable LAN cable. 2 Turn power to the display on and wait for about 30 seconds. Setting an IP address for the still image/video playback function 1 Start the browser of the computer (Internet Explorer 6.0 or later). I Preparations for Using the Network Functions 9
-
 1
1 -
2
-
3
-
 4
4 -
 5
5 -
 6
6 -
 7
7 -
 8
8 -
 9
9 -
 10
10 -
 11
11 -
 12
12 -
 13
13 -
 14
14 -
15
-
16
-
17
-
18
-
19
-
20
-
21
-
22
-
23
-
24
-
25
-
26
-
27
-
28
 |
 |
