Sharp XV-Z30000 Operation Manual - Page 21
Adjust the angle, Adjust the focus and the zoom
 |
View all Sharp XV-Z30000 manuals
Add to My Manuals
Save this manual to your list of manuals |
Page 21 highlights
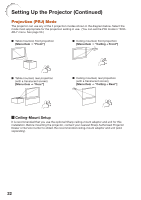
Easy Start 4. Adjust the angle Adjust the projector angle: • Shift the lens horizontally and vertically. 1 Press H&V SHIFT on the remote control. 2 Press P, R, O or Q on the remote control. • Adjust the projector angle by rotating the adjustment feet. BPP. 29, 30 5. Adjust the focus and the zoom 1 Press FOCUS +/- on the remote control to adjust the focus. 2 Press ZOOM +/- on the remote control to adjust the zoom. BP. 30 6. Correcting the image distortion due to the projection angle 1 Press KEYSTONE on the projector or on the remote control. 2 Press ENTER on the projector or on the remote control. 3 Press P, R, O or Q to move the position for the upper left of the image. 4 Press ENTER to set the position. 5 Repeat the same procedure with the positions for the upper right, lower right and lower left of the image. • When the position of the lower left is set, the correction is made and the display disappears. BP. 31 7. Select the Input mode On the projector: Press INPUT R/P to display the INPUT list. Use INPUT R/P to select the input mode. INPUT list On-screen display (HDMI1) INPUT HDMI1 HDMI2 COMPUTER COMPONENT HDMI1 YPbPr 1080P On the remote control: Press HDMI 1/2, COMPONENT or COMPUTER to select the input mode. BP. 35 8. Turn the power off Press STANDBY/ON on the projector or STANDBY on the remote control, and then press the button again while the confirmation message is displayed to put the projector into Standby mode. On the On the remote On-screen display projector control BP. 28 19
-
 1
1 -
2
-
3
-
4
-
5
-
6
-
7
-
8
-
9
-
10
-
11
-
12
-
13
-
14
-
15
-
 16
16 -
 17
17 -
 18
18 -
 19
19 -
 20
20 -
 21
21 -
 22
22 -
 23
23 -
 24
24 -
 25
25 -
 26
26 -
27
-
28
-
29
-
30
-
31
-
32
-
33
-
34
-
35
-
36
-
37
-
38
-
39
-
40
-
41
-
42
-
43
-
44
-
45
-
46
-
47
-
48
-
49
-
50
-
51
-
52
-
53
-
54
-
55
-
56
-
57
-
58
-
59
-
60
-
61
-
62
-
63
-
64
-
65
-
66
-
67
-
68
-
69
-
70
-
71
-
72
-
73
-
74
-
75
-
76
-
77
-
78
-
79
-
80
-
81
-
82
-
83
-
84
-
85
-
86
-
87
-
88
-
89
-
90
-
91
-
92
 |
 |
