Sharp XG-NV5XU XG-NV5XU Operation Manual - Page 35
Reverse/Invert Image Function
 |
View all Sharp XG-NV5XU manuals
Add to My Manuals
Save this manual to your list of manuals |
Page 35 highlights
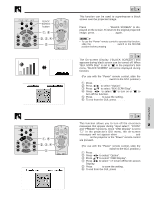
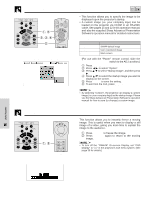
Reverse/Invert Image Function MOUSE ADJ. Projector 1, 5 2, 3 4 ON VOL MUTE OFF BLACK SCREEN LASER TOOLS MENU R-CLICK ENTER INPUT IrCOM FREEZE AUTO SYNC This projector is equipped with a reverse/invert image function which allows you to reverse or invert the projected image for various applications. Description of Projected Images Selected item Projected image FRONT Normal image CEILINGםFRONT Inverted image REAR CEILINGםREAR Reversed image Reversed and inverted image (GUI) On-screen Display When Selecting "Front" When Selecting "Ceiling םFront" (For use with the "Power" remote control, slide the MOUSE/ADJUSTMENT switch to the ADJ. position.) 1 Press MENU. 2 Press ß/© to select "PRJ Mode". 3 Press ∂/ƒ to select the desired projection mode. 4 Press ENTER to save the setting. 5 To exit from the GUI, press MENU. • This function is used for the reversed image and ceilingmount setups. See pages 12 and 13 for these setups. When Selecting "Rear" When Selecting "Ceiling םRear" Useful Features E-34
-
 1
1 -
2
-
3
-
4
-
5
-
6
-
7
-
8
-
9
-
10
-
11
-
12
-
13
-
14
-
15
-
16
-
17
-
18
-
19
-
20
-
21
-
22
-
23
-
24
-
25
-
26
-
27
-
28
-
29
-
 30
30 -
 31
31 -
 32
32 -
 33
33 -
 34
34 -
 35
35 -
 36
36 -
 37
37 -
 38
38 -
 39
39 -
 40
40 -
41
-
42
-
43
-
44
-
45
-
46
-
47
-
48
-
49
-
50
-
51
-
52
-
53
-
54
 |
 |
