Sharp R-320FK Service Manual - Page 7
Oven Diagram
 |
View all Sharp R-320FK manuals
Add to My Manuals
Save this manual to your list of manuals |
Page 7 highlights
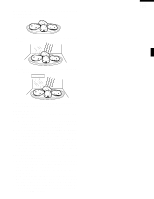
contact a qualified electrician and have it replaced with a properly grounded three-pronged wall receptacle or have a grounding adapter properly grounded and polarized. If the extension cord must be used, it should be a 3-wire, 15 amp. or higher rated cord. Do not drape over a countertop or table where it can be pulled on by children or tripped over accidentally. 3-Pronged Plug Grounded Receptacle Box CAUTION: DO NOT UNDER ANY CIRCUMSTANCES CUT OR REMOVE THE ROUND GROUNDING PRONG FROM THIS PLUG. OVEN DIAGRAM Grounding Pin 3-Pronged Receptacle 1. Door open handle Pull to open door. 7 2. Door latches 6 The oven will not operate unless the door is securely close. 9 3. Removable turntable support 4. Removable turntable The turntable will rotate clockwise or 2 counterclockwise. 1 5 10 11 8 12 5. Oven lamp It will light when oven is operating or 4 door is opened. 3 6. Oven door with see-through window 7. Ventilation openings (Rear) 8. Auto-Touch control panel TOUCH CONTROL PANEL 9. Time display: Digital display, 99 minutes 99 seconds 10. Coupling 11. Wave guide cover 12. Power supply cord R-320FK R-320FQ R-320FW NOTE: Some one-touch cooking features such as "MINUTE PLUS"are disabled after three minutes when the oven is not in use. These features are automatically enabled when the door is opened and closed or the STOP/ CLEAR pad is pressed. 5
-
 1
1 -
 2
2 -
 3
3 -
 4
4 -
 5
5 -
 6
6 -
 7
7 -
 8
8 -
 9
9 -
 10
10 -
 11
11 -
 12
12 -
13
-
14
-
15
-
16
-
17
-
18
-
19
-
20
-
21
-
22
-
23
-
24
-
25
-
26
-
27
-
28
-
29
-
30
-
31
-
32
-
33
-
34
-
35
-
36
-
37
-
38
-
39
-
40
-
41
-
42
-
43
-
44
 |
 |
