Sharp MX-M6050 Start Guide - Page 52
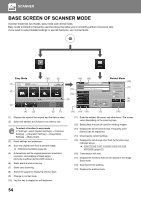
Tap the [All Destinations] key., Confirm the destination., to change screens and select, settings.,
 |
View all Sharp MX-M6050 manuals
Add to My Manuals
Save this manual to your list of manuals |
Page 52 highlights
SCANNER 6 FFF FFF Address 1122334.n.nee.j.pjp Sort AAA AAA BBB BBB CCC CCC DDD DDD EEE EEE FFF FFF Frequent Use Category All CA Scan to HDD/ USB Tap the [All Destinations] key. A list of the selected destinations appears. B/W Start Color Start 7 All Destinations Confirm the destination. 1 CA If an incorrect destination appears in the list, tap the FFF FFF 1234.ne.jp Scan to HDD/ USB destination and then tap the [Delete] key. To Cc Delete B/W Info. Start Color Start 8 Original 8½x11 Address E-mail Address Tap to change screens and select Detail settings. Original Resolution File Format Blank Page Skip Change settings as needed. Auto 200x200dpi PDF Off PDF The functions below can be enabled in easy mode. • Original • Resolution • File Format CA Preview Auto Set B/W Start Color Start • Blank Page Skip To select more detailed settings, tap the [Detail] key and select settings in normal mode. ► SCANNER MODE (page 53) 9 Original 8½x11 Address AAA Tap the [Color Start] key or [B/W Start] Detail key. Address Book Sending History Global Address Search Scan to HDD/ USB • In the factory default state, the machine detects whether the original is black & white or full color when you tap the [Color Start] key, and automatically switches between full color and black & white binary scanning. When you tap the [B/W Start] key, the machine scans in black & white CA Preview Auto Set B/W Start Color Start binary. For details, see the User's Manual. • To check a preview of a document, tap to return to the base screen of Easy Scan and tap the [Preview] key. ► PREVIEW SCREEN (page 20) Cancel scanning Cancel Scan 52
-
 1
1 -
2
-
3
-
4
-
5
-
6
-
7
-
8
-
9
-
10
-
11
-
12
-
13
-
14
-
15
-
16
-
17
-
18
-
19
-
20
-
21
-
22
-
23
-
24
-
25
-
26
-
27
-
28
-
29
-
30
-
31
-
32
-
33
-
34
-
35
-
36
-
37
-
38
-
39
-
40
-
41
-
42
-
43
-
44
-
45
-
46
-
 47
47 -
 48
48 -
 49
49 -
 50
50 -
 51
51 -
 52
52 -
 53
53 -
 54
54 -
 55
55 -
 56
56 -
 57
57 -
58
-
59
-
60
-
61
-
62
-
63
-
64
-
65
-
66
-
67
-
68
-
69
-
70
-
71
-
72
 |
 |
