Sharp MX-M1056 Software Setup Guide - Page 14
Enable options and peripherals
 |
View all Sharp MX-M1056 manuals
Add to My Manuals
Save this manual to your list of manuals |
Page 14 highlights
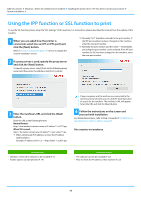
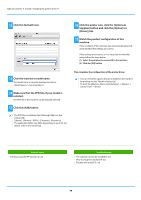
Table of contents X Windows / Select the software to be installed X Installing the printer driver / PC-Fax driver (common procedure) X Standard installation / Advanced installation / Custom installation X Enable options and peripherals 1 Click the [Start] button, select [Settings] → [Device] → [Devices and Printers]. In Windows 8.1/Windows Server 2012, right-click the [Start] button, select [Control Panel] → [View devices and printers] (or [Devices and Printers]). 2 Open the printer properties window. (1) Right-click the printer driver icon of the machine. (2) Select [Printer properties]. 3 Click the [Configuration] tab. 4 Click the [Auto Configuration] button. The settings are automatically configured based on the detected machine status. 5 Click the [OK] button in the printer properties window. When using the PPD driver, when the "Printer property screen" is displayed in step 2, follow the steps below: (1) Click the [Device Settings] tab. (2) Configure each item based on the machine configuration. The items and the procedures for configuring the items vary depending on the operating system version. Related topics • Windows / Select the software to be installed (P. 3) • Changing the port (P. 15) Troubleshooting • The software cannot be installed (P. 22) • How to check the status of the peripherals (P. 22) • Problem with Windows (P. 23) • The options and peripherals of this machine could not be automatically setup (P. 23) 14
-
 1
1 -
2
-
3
-
4
-
5
-
6
-
7
-
8
-
 9
9 -
 10
10 -
 11
11 -
 12
12 -
 13
13 -
 14
14 -
 15
15 -
 16
16 -
 17
17 -
 18
18 -
 19
19 -
20
-
21
-
22
-
23
-
24
-
25
-
26
 |
 |
